1.6 Activate your Schedule
Aug/25/2007
Activating your Schedule in Tradepoint Enterprise is done in two steps. Establishing your hours or 'Availability Stream' is the first step and the second step is in the Schedule Setup where you specifiy within your Employee profile which Schedules you are going to see (including your own).
Within an Employee profile click on the Availability icon in the tool bar of Employees. You will see the screen below open. If there is no Availability established then there will be nothing listed like in this example. Multiple Streams of Availability can be established and if that is the case they will each be listed here.
For the purposes of getting started quickly we will illustrate creating one set of Available hours within an Employee profile. Within an Employee profile click the availability icon. This example shows a schedule already setup.

Clicking the 'New Stream' icon will open the window you see below to specify the hours and any rate for Billable hours that will be associates with a particular Employee profile.
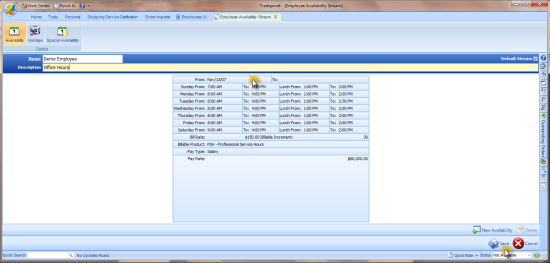
Enter in the name and a description above. These will be the visible label for the type of hours for this Schedule.
The applicable dates uses a drop down calendar to establish the date that this Schedule will be active. Generally, we recommend that the 'To' section be left open simply because the very day after a 'To' date has been set this Schedule will no longer be active. So, unless there is a specific reason why a Schedule will not be live any longer there is no need to set the 'To' field.
Entering in the time is done easily. Start typing in the number for the hours and it will finish in that filed. If you have consistent hours available hit the return key and every space will have that beginning hour entered in on Monday through Friday. The same will go for any weekend hours or lunch hours provided you have the same lunch hour or weekend hours available.
For employees working less than the company's default work days ("part-time" employees) the days not worked must be "skipped" in the stream. To set a default work day to skipped, set the Day's From time to "null" (by selecting the cell and pressing CTRL+0 (zero)) and the Day's To time to "12:00 AM" and set Lunch From and To times to null as well. (This says that, on a skipped day, the employee starts work at "no time" and ends work at "no elapsed time".) (Using null ensures that a cell is completely empty.)
For any Billable Hours enter in the rate in the space provided. Be sure this corresponds to the actual rate for a Billable Hours that has been established within your products as well by creating a non-Inventoried item within your products. The product can be assigned to this Schedule within the Employee profile by clicking on the Billable Service field and choosing the Product that is associated with the specific Employee profile.
Be sure to Save your Settings and then log out and log back in to activate your Schedule. You will see the Schedule icon lit up within the Home tab when you log into Tradepoint.