12.7 How to Create a Mail Merge Document Template
Jul/25/2006
Tradepoint
allows you to perform mail merges against Microsoft Word 2000 or later. To
do so requires that you setup your document template that you will start from.
To simplify the process Tradepoint does not use the Word Mail merge process so
that you do not need to know anything about databases etc. This tutorial walks
you through generating the template using the merge fields available in
Tradepoint.
Since you
will have to perform a search to generate a list of people to send your document
to the Mail Merge tool is located within the Advanced Search Tool on the left
hand side of the Tradepoint Interface.

The Mail
Merge tool will open a wizard that will interact with the version of Microsoft
Office you have on your computer.
Instructions
for Word 2003
(If you are
using Word 2007 or later please skip to the section below.)
Tradepoint
uses the Form Fields functionality of Microsoft Word to provide Mail Merge
Functionality. Each of the tags below can be put into your Word document
as Text Labels using the Form Fields tool bar.

 You can show
the Forms tool bar by going to the View menu and choose the tool bars menu and
clicking on "Forms" The items with check boxes beside them are currently
visible.
You can show
the Forms tool bar by going to the View menu and choose the tool bars menu and
clicking on "Forms" The items with check boxes beside them are currently
visible.
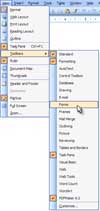
 To use a tag
simply add a new Text Field (
To use a tag
simply add a new Text Field ( ) to your document.
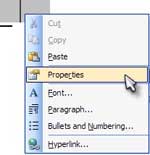
Once you have the text field you will see a gray area. Simply right click on it
and choose Properties. (To the right)
) to your document.
Once you have the text field you will see a gray area. Simply right click on it
and choose Properties. (To the right)
Once you are in the properties window you need to fill in the
default text section.

Simply enter the tag name into the Default Text field.
Capitalization does not matter, simply make sure that you don't have any spaces.
Once you have done so, click OK. You can now format the field however you
wish, put it in styles or whatever else you wish to do. When you create a new
document based on the template the information will automatically be filled in
for you.
Word 2007
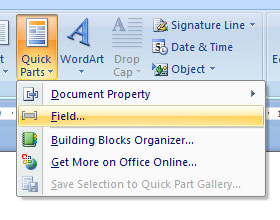 With
Word 2007 everything has gotten easier and harder all at the same time. To
add a merge field click on the Insert tab in Word and then click on "Quick
Parts" as shown to the right and then click "Field...".
With
Word 2007 everything has gotten easier and harder all at the same time. To
add a merge field click on the Insert tab in Word and then click on "Quick
Parts" as shown to the right and then click "Field...".
After clicking "Field..." you will be presented with the following
screen:
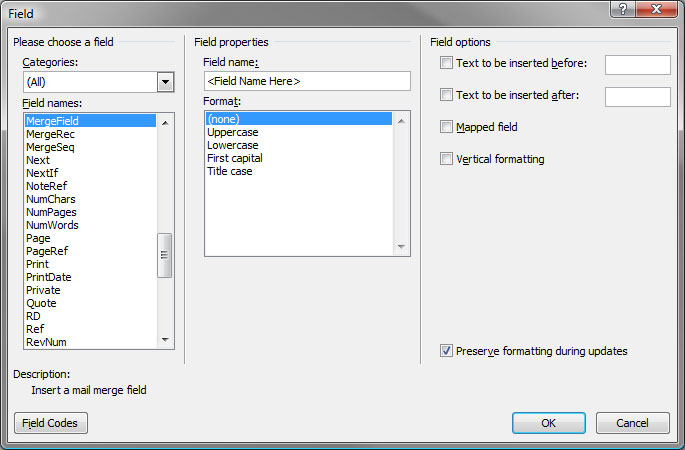
Note that under Field names we have chosen "MergeField". It is very
important that you choose this option as you will not get the option to enter
the field name as noted above. After choosing "MergeField" from the Field
Names list, type in the field name that you wish to have merged into the Field
Properties section. The list of available merge fields are provided below
for your convenience.
After clicking OK you will have a merge field added to the document
that you are working on. Once you have added all of the fields that you wish to
have in the document, save it and you are ready to do your first mail merge. (If
you didn't create the Document Template from inside Tradepoint to start with,
you will need to go to the Tools tab, then click on "Documents" under the
template section and add the template using the import functionality before you
can start your mail merge process.)
Available Merge Fields
Below is a list of the standard contact fields that can be used in
a Mail Merge. This is not a complete list of the available
fields, those that are most often required when doing a mail merge. If
you require a field that is not listed below, check the Knowledge Base section
of the Tradepoint website or contact technical support for
assistance.
| Tag |
Description |
| <AccountNo> |
The Account # of the contact or Company. |
| <CompanyName> or <Name> |
The name of the contact or Company. |
| <Title> or <Salutation> |
The title of the individual contact or staff member of the
company. |
| <FirstName> |
The first name of the individual contact or staff member of
the company. |
| <Initial> |
The middle initial of the individual contact or
staff member of the company. |
| <LastName> |
The last name of the individual contact or staff
member of the company. |
| <Address> |
The Address of the Contact formatted Correctly. |
| <Street1> or <StreetName1> |
The first street in the contact's address. |
| <Street2> or <StreetName2> |
The second street (if any) in the contact's address. |
| <City> |
The City in the contact's address. |
| <Prov> or <Province> or <State> |
The Province or State of the contact's address. |
| <Postal> or <Zip> or <PostalCode> |
The Postal Code/Zip Code of the contact's address. |
| <Country> |
The Country (if it exists) of the contact's address. |
| <Phone1> |
Primary Phone number of the Contact. |
| <Phone1Ext> |
Primary Phone's Extension. |
| <Phone2> |
Secondary Phone number of the Contact. |
| <Phone2Ext> |
Secondary Phone's Extension. |
| <Fax1> |
Primary Fax number of the Contact. |
| <Fax2> |
Secondary Fax number of the Contact. |
| <Cell> |
Mobile Phone number of the Contact. |
| <Pager> |
Pager number of the Contact. |
| <PagerExt> |
Pager's Extension (if any). |
| <TollFree> |
Toll Free Phone number of the Contact. |
| <SiteURL> |
Contact's Web address. |
| <Email> |
Contact's Email address. |
| <SecondaryAddress> |
Secondary Address of the Contact formatted Correctly. |
| <SecondaryPhone1> |
Secondary Phone #. |
| <SecondaryPhone1Ext> |
Secondary Phone Extension. |
| <SecondaryPhone2> |
Secondary Phone 2 #. |
| <SecondaryPhone2Ext> |
Secondary Phone 2 Extension. |
| <SecondaryFax1> |
Secondary Fax. |
| <SecondaryFax2> |
Secondary Fax #2. |
| <SecondaryCell> |
Secondary Mobile Phone #. |
| <SecondaryPager> |
Secondary Pager #. |
| <SecondaryPagerExt> |
Secondary Pager Extension. |
| <SecondaryTollFree> |
Secondary Toll Free #. |
| <OpenDate> |
The Opening Date of the Contact. |
| <CloseDate> |
The Closing Date (if any) of the Contact. |
| <DateOfEntry> |
Date that the Contact was entered into the System. |
| <Alias> |
Other name of the contact or company. |
| <Birthday> |
The Birth Day of the contact if it is an individual. |
| <Anniversary> |
The Anniversary of the contact if it is an
individual. |
| <Manager> |
The individual's manager. |
| <Assistant> |
The individual's assistant. |
| <UserName> or <WebLogin> |
The web site login for the personnel. |
| <Password> or <WebPassword> |
The web site password for the personnel. |
| <Notes> |
Any Notes you have on the Contact. (be careful with this
one for obvious reasons!) |
| <ReferralCompanyName> |
The name of the referrer. |
| <ReferralStreet1> |
Street 1 of the referrer's address. |
| <ReferralStreet2> |
Street 2 of the referrer's address. |
| <ReferralCity> |
The City of the referrer's address. |
| <ReferralPostal> |
The Postal Code/Zip of the referrer's address. |
| <ReferralCountry> |
The Country of the referrer's address. |
| <ReferralPhone1> |
The Primary Phone number of the referrer. |
| <ReferralPhone1Ext> |
The Primary Phone number's Extension of the referrer. |
| <ReferralPhone2> |
The Secondary Phone number of the referrer. |
| <ReferralPhone2Ext> |
Secondary Phone's Extension. |
| <ReferralFax1> |
Primary Fax number of the referrer. |
| <ReferralFax2> |
Secondary Fax number of the referrer. |
| <ReferralCell> |
Mobile Phone number of the referrer. |
| <ReferralPager> |
Pager number of the referrer. |
| <ReferralPagerExt> |
Pager's Extension (if any). |
| <ReferralTollFree> |
Toll Free Phone number of the referrer. |
| <ReferralSiteURL> |
Contact's Web address. |
| <ReferralEmail> |
Contact's Email address. |
| <ReferralSecondaryAddress> |
Secondary Address of the referrer formatted
Correctly. |
| <ReferralSecondaryPhone1> |
Secondary Phone #. |
| <ReferralSecondaryPhone1Ext> |
Secondary Phone Extension. |
| <ReferralSecondaryPhone2> |
Secondary Phone 2 #. |
| <ReferralSecondaryPhone2Ext> |
Secondary Phone 2 Extension. |
| <ReferralSecondaryFax1> |
Secondary Fax. |
| <ReferralSecondaryFax2> |
Secondary Fax #2. |
| <ReferralSecondaryCell> |
Secondary Mobile Phone #. |
| <ReferralSecondaryPager> |
Secondary Pager #. |
| <ReferralSecondaryPagerExt> |
Secondary Pager Extension. |
| <ReferralSecondaryTollFree> |
Secondary Toll Free #. |
Related
Articles
<Articles>