Installation
Instructions
1)
Please make
sure your computer is running Windows 2000, Windows XP, Windows Vista, Windows
2003 or later and the Microsoft .NET Framework 2.0 is installed. The framework
can be downloaded from the Microsoft web site at this location: http://www.microsoft.com/downloads/details.aspx?FamilyID=0856eacb-4362-4b0d-8edd-aab15c5e04f5&DisplayLang=en
2)
We have determined the best tool for editing Tradepoint database
driven websites to be Visual Studio 2005.
If you are not using the software already, a free “express” version of
the software can be downloaded here: http://msdn.microsoft.com/vstudio/express/vwd/download. Going through the many stages of
installing the software may take a few minutes depending on your internet
connection.
3)
After the software has downloaded (or while the software is
downloading) please feel free to download your default "templated" website by
clicking the link found in the email sent to you by our tech staff shortly after
you purchased Tradepoint for Web.
4)
Now you have two choices:
a.
If you are a programmer and plan on using IIS for debugging
purposes please follow the instructions in located in at: http://www.tradepoint360.com/KB/Article.aspx?ArticleID=685AD57E-A21A-40E5-8F64-4B7586DA5E3E
to setup IIS correctly and then extract the zip into your IIS site's root
directory"
b.
All other users please extract the files into any directory on
your computer other than inetpub or wwwroot. Even your desktop will do. Please place the files where you desire
to keep them for development purposes.
Bonus:
Visual Studio .NET 2005
provides the ability to manage database driven web presences without the need of
IIS or even an XP Pro operating system.
Getting Oriented
5)
Now that you have gone through the VS.NET installation procedure
and your setup files are located where you desire them to be, please start
Visual Studio .NET (VS.NET) for the first time.
6)
Once VS.NET has loaded for the first time, please select “File”
from the menu items then select “Open Web Site…” from the drop down menu. VS.NET
will automatically bring in the entire “Project” or directory tree for your
website.
7)
At the far right hand side of the screen you will see a screen
entitled “Solution Explorer”. This
solution explorer acts as a quick reference of all of your website files. You can open, edit and save all of your
site changes by double clicking files from this window and saving in the
standard manner (File -> Save __Filename__)

8)
Tradepoint for Web has been written using ASP.NET technology
therefore the files you will be altering to affect your web changes will be all
files with an “.aspx” extension.
Also Tradepoint for Web uses CSS (Cascading Style Sheets) to provide many
of the “branding” colour, layout and behaviours of your site. There is plenty of support on the
internet on how to use this technology successfully. CSS files end with the extension
“.CSS”
Final Setup
9)
Now that you are oriented with the software, please open any of
the “.aspx” files. I suggest
“Default.aspx” from your Solution Explorer located on the right. Open it by double clicking the file
name
10) You will notice the
file loads in the center of the screen showing the HTML source code. You can please switch this view to
design view by clicking the “Design” button located at the very bottom of the
screen. Once you do this you will
notice the centre screen changes to remove the HTML code and replace the content
with a rendered view of basically what your site would look like. You can feel free to use both modes when
designing your site.
For those
of you who like using keyboard commands more than mouse clicks. These views can be swapped by typing Ctl
PgUp or Ctl PgDn (Control Page UP or Control Page Down)
11) Ok. Now you are in
design view. Look to the left of
your screen and see the title “Toolbox”.
Underneath that you will see the word “Standard” with a “-” sign to the
left of it. Through this window you
can drag HTML and other commands onto your webpage. We are now going instruct you how to
import the Tradepoint Web Controls into VS.NET so that you can do database
management without ever needing to programming a single line of code.
12) Right Click on the word
“Standard” and select the “Choose
Items…” heading.
Wait a minute
and a window will pop up. Please be
patient.
13) In the Choose Toolbox
Items window please look to the bottom right of that popup window, locate the
“browse” button and click it. Up
will pop another window
14) In this new “open”
window, please navigate to where you saved the template website. After you have found the folder, please
open it to reveal its contents (if you have not already). Once the site is open
you will see a folder named “BIN”. Please open that folder. Now you will see a series of files. Please select (double click) the
Tradepoint.Web.dll from the list of files and or highlight the file and click the
“open” button. The window will
close and then please click the “OK” button to close the “Choose Toolbox Items”
window.
15) Congratulations! You
have now imported the entire Darwin Custom Database tools into your VS.NET
application. Now you are ready to design to your heart’s content!
Final
Orientation
16) Let us take advantage
now of the fact that you have already opened the Default.aspx file and introduce
you to how you can easily add a database driven field to your new website.
17) If you are not in
“design view” of the Default.aspx file please change the screen to the design
view by following the procedure found in step 10. We are doing this only for simplicity’s
sake. You can do what we are about
to do from either view.
18) Look over to the left
of your screen and located the “Toolbar” window again. Scroll the elevator down to the very
bottom of the page. You will see
two icons floating at the bottom: WebDynamicList and EcommerceField. You will also notive a new “Localize”
icon as well higher up in the list.
19) Click the mouse on the
WebDynamicList icon and hold the button down. Drag (or move) the mouse pointer to the
anywhere on the white space you see in the center of your screen. You will notice you pointer changes from
a circle to an arrow again. Once
your pointer changes to an arrow, release the mouse button.
20) Congratulations! You
have now created a new database driven component on your web page without any
programming what so ever! Now
look to the right of your screen just below your “Solution Explorer”
21) You will notice a
“properties” window and below that title you will see a property named
“WebDynamicList1”. Below that you
will see information about the property you WebDynamicList item you just
created. Scroll down in that window
until you see the titl “ParentObject” and notice the blank space to the right of
that title. Click on the blank
space beside the ParentObject title and select the drop down that appears; you
will see a long list of all of the different types of database tables inside of
your Tradepoint. This window allows
you access to display information in any (security enabled) section of the
software. Let’s now select product
as an example; it should be second from the top in the drop window that just
poped up; unless the Tradepoint technology department made some recent database
changes :).
22) Now that you have
successfully selected product from the drop down menu, please scroll your
property window up until you see the “Columns” title. Click on the white space beside that
title and you will see a “…” button.
Click it. Up will pop up a
whole bunch of sub headings inside your product database table. This is information you can select to
render on your website. Let’s check
off “Product.Name” and “Product.Description” for this example. The titles say it all.
23) If you leave the page
as it is, your website will list all of your products and show the names and
descriptions that you have stored in your Tradepoint for Windows Global Business
Management product. Your site will
always show you the most up to date information within your company as long as
you stay synchronized to your web server that serves your site: This is automatically set when you
install your Tradepoint so you need not worry about it; Other Knowledge Base
articles explain this in more detail
24) One last thing. What happens if you want to filter the
list that is displayed on the screen to show only a few select products? Well, it’s easy. In the same window where you set your
“ParentObject” and your “Column” information (the “properties” window), scroll
through the list until you see the “Filter” title. In the blank space provided to the
right of that title you can now enter specific filter criteria to display
specific information from your Tradepoint Database system
Configuring your Website to be linked to your
company's database:
- Scroll down to the bottom of the file list in the
Solution Explorer and find the file "web.config". Double-click this
file to open it in the design window.
- Near the top of the web.config file you will find a section called
<appSettings>. This section contains all of the settings for this web
site.
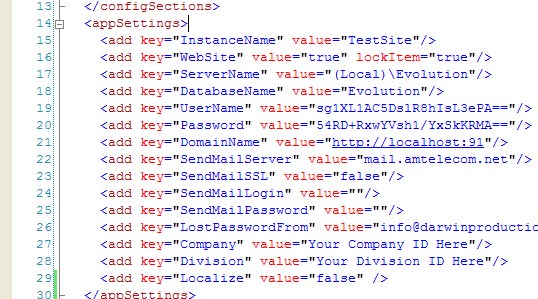
You will need adjust a number of these settings before the web site will
work on your computer. Do not remove any of these settings as they are
required for the web site to run correctly. To adjust the settings simply
change the text inside of the value="" tag.
InstanceName: Enter a name for this web site. If you are
running multiple web sites on the same server this setting will be important
to ensure that each uses the correct settings.
WebSite: Do not change this value.
ServerName: This is the location of the server that the
Tradepoint database is located on. The default value is "(Local)\Tradepoint"
which means it will use the database that is on the current machine. If your
Tradepoint database is located on a different machine, enter the correct path
to the database server in this section.
DatabaseName: You
should not need to change this setting, unless you have multiple copies of
Tradepoint running on your computer. In that case, enter the desired database
name.
UserName and Password: Do not
change these fields.
DomainName: This is the location of the web site when you
run it. Make sure that the number at the end, 91 in the example above, is the
same number that you entered as the Port number for the web site earlier.
SendMailServer: The mail server that will be used to send
contact forms, lost password messages and any other e-mail generated by the
web site.
SendMailSSL: If your send mail server requires a
secure connection, set this to true.
SendMailLogin: If
your send mail server requires you to log in before sending, enter your
mail login here.
SendMailPassword: If your send mail
server requires you to log in before sending, enter your
mail password here.
LostPasswordFrom: Enter the
e-mail address that you want to appear as the From address on mail sent from
the web site to users.
Company: In this field you need to enter the ID of the
Company that the web site is for. You can find this ID value in Tradepoint by
going to File - Company Setup. Select the appropriate company and go to the
Web Site Configuration section. On this screen you will find the Company ID.
Copy the ID and paste it into the appropriate spot on the web.config
file.
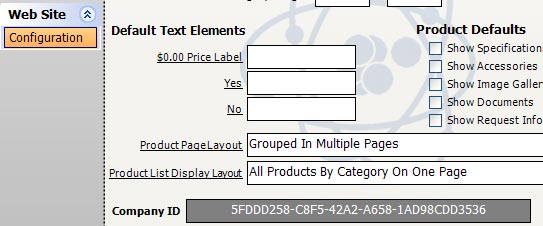
Division: Like the Company field, this sets the default
Division for the web site. You can find this ID value in Tradepoint by going to
File - Company Setup and selecting the Divisions item. Select the division
that will be the default division for the web site and double click to open
the Division. On the Company Division window go to the Web Site Configuration
screen. On this screen you will find the Division ID. Copy the ID and paste it
into the appropriate spot on the web.config file.
Localize: If you are running a multi-lingual website then
set this property to True.
Viewing the Web Site
- When all of the settings have been correctly configured and you wish to
view the web site press F5 to launch the site.
Superb Tutorials
Some fantastic tutorials for Visual
Studio Developer Express Edition 2005 can be found on Microsoft's website:
http://msdn.microsoft.com/vstudio/express/vwd/learning/