Below is a screen view of the main page you see when a New
Project is created or you are opening an existing Project where the Scope and
overview of your Project is outlined.
To start a New Project click on the New Icon in the lower left
hand corner. To open an existing Project simply type in all or part of a name
into the Quick Find Field and click the Search tool to the right of the field.
To list all Projects you have access to simply click the Search tool without
entering any data into the field.
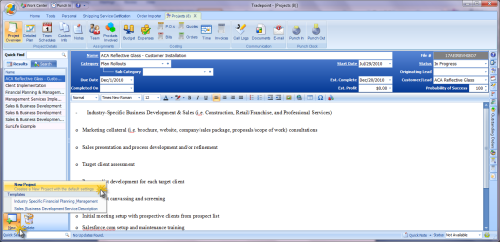
Name - The field for the name of your
Project
File # - This is a identifying number
generated by Tradepoint.
Category - The customizable field for
the type of Project it is. Clicking on the blue plus will open the Setup and
Configuration tool allowing you to create as many Categories as necessary for
your Company.
Sub Category - For each Category there
can be a Sub Category. This is Optional and can be left blank if this is not
relevant to your work flow process.
Start Date - This field contains a
drop down calendar so you can establish the date a Project is
started.
Due Date - This field contains a drop
down calendar to specify the date a Project is due to be completed.
Est. Complete - This field also
contains a drop down calendar to establish a date for when a Project is
estimated to be complete.
Completed On - This field contains a
drop down calendar to note when a project is actually completed. This
information allows a company to monitor the timeliness of project completion
between when a Project is Estimated to be completed and when it actually is. All
of the parameters for a Project will be visible through the Web Module of you
are using one to collaborate with your Clients on any current
Projects.
Est. Profit - A drop down calculator
will allow you to either type in the Estimated Profit or perform any necessary
calculations of estimated profit within this field. This tool is also useful
when combined with the budgeting and expense tracking tools explained in further
articles.
Status - This field is where you can
specify what the Status is of a Project. This information can be seen by
clients if you are using one of our Web Modules to interface with your Clients
on Projects
Originating Lead - Specify the Lead
that a Project originated from with the built in Search tool in this field.
Simply type in all or part of a Lead's name to find the right one. This tool is
ideal for Marketing purposes to keep track of how you are finding
clients.
Customer/Lead - Associate a Project
with a current client directly by typing in all or part of their name within the
built in Search tool. This will also allow an Project to be accessed directly
from a Customer's file and accounting information such as Quotes will also be
accessible through their file as well as the Project associated with a Client
directly.
Probability of Success - Keep track of
a probability of success by typing in the percentage or using the arrows to go
up or down with the probable rate of success for your Project.
The remaining part of the screen is a HTML editor for you to
enter in any description or Cut and Paste any information about the Projects
overview here.
Project setup happens from the main project screen or from a contact file
when a new project is created, Creating a project from the projects section is
done using the option under the New button on the lower left of the screen.
Any
existing templates will appear in the pop-up menu seen in the lower left.. The
New Project option will create a new blank project with all the details to be
filled in.