13.5 Email Templates
Apr/15/2007
Within Tradepoint Templates related to web management are available for Knowledge Base Articles, Press Releases, and Emails. The Templates section is
accessible through the Tools Tab.

The Templates section allows you to create templates
with pre-configured formatting so you have consistency in how your information
and communications are presented.
The formatting includes Text(font size and
type), text indentations, headings
and any images such as a company logo you would want to be consistent throughout
your Templates. Inserting an Image can be done with the Insert Image
icon  in
the editing toolbar of the main window.
in
the editing toolbar of the main window.

Additional Templates will be listed on the left by
Title. Enter in your text with any images and Links on this page you see above.
Changes will automatically be saved.
These Templates once created, will now show up in a
pop-up menu with all templates listed to choose from in a New Email Message
screen similar to the view such as
the one below.
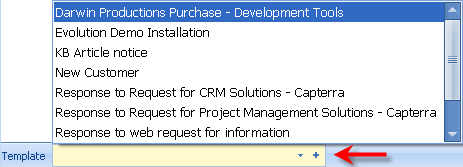
The arrow to the right of the field will open the
popup menu to choose from existing templates. The Blue Plus just next to it will
open the screen for you to create a New Email Template
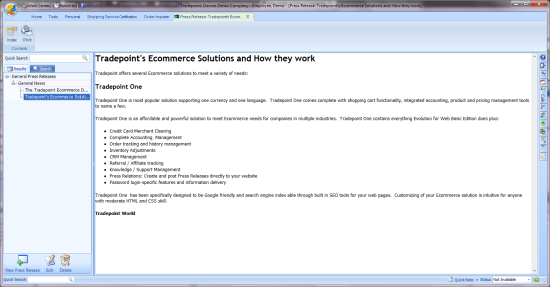
Both Knowledge Base Articles and Press Releases use
the same styles window for creating a Knowledge Base Article and a Press
Release. The section for both a Knowledge Base Article and a Press Release will
show and expandable outline structure on the left and when any article is
clicked on then the body of the article will show in the main window on the
right.
Below is a screen view of the main window where a
Press Release article is created.
The window for knowledge base articles is similar.
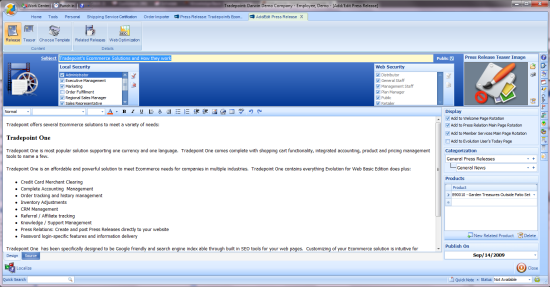
When you have created the main Press Release then
simply save your changes and your Press Release will be posted to your website
the next time your synchronize.
The example screen view below is the main page to
create a Knowledge Base article.
The format is very similar to the main page where a
Press Release is created.
Subject- Create a
Subject for your article. This will be shown in the outline and if you choose to
list your articles on your website.
Local Security-
Establish security settings for internal permissions. If you
would like the article to be available for everyone then check the Select all
icon  to the right of the listed security
permissions.
to the right of the listed security
permissions.
Web Security- This is
the same as the local security setting only these will apply to who can view the
article on your website. Simply check off which profiles will be able to view
your article or choose the Select All icon if you would like your article to be
public.
Article Date- The
article date will default to the date the article is created however, you can
set a date in the future by using the drop down calendar built into the Article
Date field to choose a date in the future for your article to be released. Any
articles set to be released in the future will simply become viewable on your
website on the chosen date.
Parent- With this
field choose the Parent article to associate your article with. The article will
then automatically be listed under the chosen Parent article. A Parent article
can also be changed with an existing article by opening the existing article and
then choosing a different Parent article to be associated with. If an article
does not have a Parent then you can
just leave the field blank. Save your changes when you are finished and your
article will be listed under the different Parent article.
Categories- Each
article has to belong to a Category. One can be chosen with the arrow to the
right of the field. If the right Category does not exist then the Blue Plus to
the right of the field will open the Setup and Configure tool to create a New
Category. Categories can also be edited in the same way they are created.
Products- If any
Products are associated with your article you can search for and choose them
with this tool. Simply type in all or part of the Product name or Item number
and any Products with that name or item number will come up listed. Clicking on
one or more Product will associate those Products with this
article.
The icons at the top of the window will allow
you to create the Teaser page, link other articles to this one and attach any
Documents to this article. Documents are often associated with a Knowledge Base
article in the case of detailed User Instructions, any safety concerns or
warnings, and recommendations for use.
Related Articles
<Articles>