14.38 How to create a Products Assembly
Apr/4/2007
Creating a product
that is comprised of other Products that accounts for all costs of built
components can be done easily with the Product Assembly Tool in
Tradepoint.
The Assembly Tool
is found within Products and is activated by checking the Assembled box  within a particular Product. The assembled
box can be seen circled in the screen view below.
within a particular Product. The assembled
box can be seen circled in the screen view below.
When the Assembled
icon has been checked you will also notice the Assembly icon in the top toolbar
has been enabled. The Assembly icon in the top toolbar will only be enabled when
the Assembled box on the Setup page has been checked. This way products will not
automatically become part of an Assembly unless a Product is specified to be
part of an Assembly.
Each Product that
is either Assembled or a part of an Assembly must have this box checked for the
Accounting information to automatically be figured it to an assembled Product
each time one is assembled.
After the
information for the Product Setup has been entered click the Assembly icon and
you will see the main screen for specifying which Products are a part of your
Assembled product. The main screen for Assemblies is shown below.
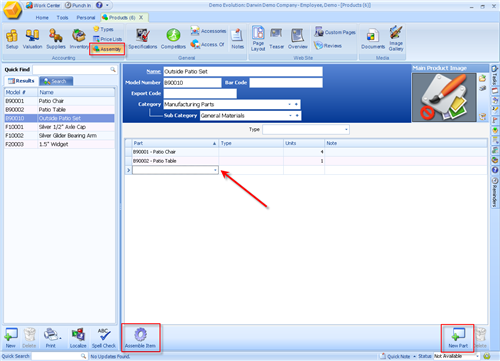
Part- This field contains a drop
down menu for you to pick which items are going to be a part of your Assembly.
Simply type in all or part of a Product and click on it to add it to this
Assembly.
Type- This field will allow you to
specify the type of a product such as Color or Size.
Units- Specify the number of Units
of a Product within an Assembly. An example would be 4 chairs assembled with a
table to create a Patio set.
Note- A Notes field to add any
additional information within this Assembly.
When you have added
all the parts for your Assembly click the Assemble Item icon  . Your Product will be assembled
automatically and display in your available inventory.
. Your Product will be assembled
automatically and display in your available inventory.
Related Articles
<Articles>