14.5 How to Create an Appointment
Apr/1/2007
There are two basic way to create an
appointment. Anywhere you see the New Appointment icon,  the New Planned Appointment
icon
the New Planned Appointment
icon  or
opening the menu directly within the Schedule by hovering the mouse over a
desired time within the Schedule and right clicking. This icon will appear when
you choose a time from directly within the Schedule.
or
opening the menu directly within the Schedule by hovering the mouse over a
desired time within the Schedule and right clicking. This icon will appear when
you choose a time from directly within the Schedule.

From there the main window will open for you to fill
in the details to create your appointment. From this window you
can:
1.
Invite multiple Employees to an
Appointment.
2.
Establish a recurring meeting if
necessary.
3.
Send email notifications to guests outside your
organization about a meeting.
4.
Create reminders regarding the meeting.
5.
View a history of a scheduled meeting to see any changes
including who made them and why.
6.
Set the Status of a Meeting.
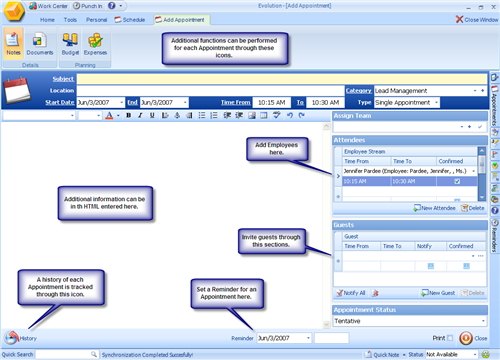
Each field where you will add detail has built in
functionality. For example, the Reminders field at the bottom of the window has
a pop up calendar to choose the date of the Appointment.
Each of the field for both Employees and Guests is
searchable so you only need to enter in a partial name click the search tool on
the right side of that field and then highlight the correct name.
When you are finished entering all of your details
then Save your changes and you have created an Appointment
Please note that there must be a Contact entry for
either an Employee or a guest for that person to be invited to a
meeting.
Click
Here to view a Video