Example: If you
have an Engineering firm that offers a range of services from home design and
building, government contracts for schools and public buildings, road and
drainage construction then with each new Customer you are going to have specific
processes that have to happen with each of the mentioned types of Customers.
A new Customer who is building a house may need an
appointment for an initial consultation followed by a meeting to go over
the stages of the project and what is involved from beginning to end. These
meetings can automatically be generated when a new customer is added to the
'private home' Category within
Customers.
Example: A web based
company specializing in sporting goods. For each online sale that Customer will
be assigned to a Category and based on the Events assigned to that Category
action items are automatically generated such as a thank you email will followed
with a phone call to that Customer to confirm their order and verify their
shipping information. Then following the email and follow up phone call a Task
will also be automatically generated to fulfill their order within 48 hours if
the inventory is available.
All of these action items will be generated
as soon as the New Customer is assigned to a specific Category. As you are
setting up your Categories and Statuses you will notice a row of icons at the
bottom of the Setup and Configure Tool. These icons are all events that can be
associated with a particular Category or Status each time a Contact is assigned
to that Category or Status.
Establishing Event Management
within Tradepoint
Below is a screen view of the
Setup and Configure Tool where Events would be assigned to Categories. The icons
highlighted in red are the icons you click on to assign a particular event with
a Category. Each icon will open a Template for you to assign the details and
time frame for each Event to happen when a Customer is assigned to a specific
Category.
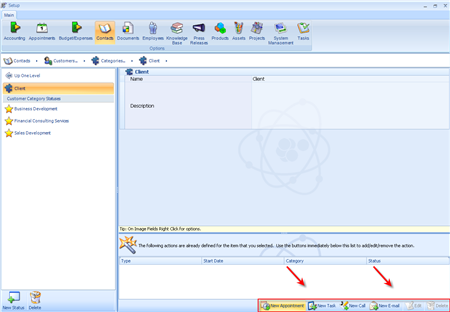
The fields where the highlighted blue set
of fields is where automated action items can be established in relation to a
particular Category(in this case the category is 'Software Customer'). Any
Action Items assigned to a Category will be listed in the section just above the
icons.
Below is the tool bar with action items you can assign to a Category
or Status. Choose events in the order that best matches your work flow
process.
Example:
A Landscape
Architecture Firm receives new Leads over the Internet as a Request for
Information about existing Services. When that Lead comes into Tradepoint through
one of our Ecommerce solutions is automatically assigned to the Category of 'Web
Lead'.
The Category 'Web Lead' has a series of Events attached to it
that will take the new Web Lead through a series of Action Items designed to
provide the potential customer with the information through the most favorable
experience possible to acquire their business. Some of the Events could
include:
1. New Email - Introductory email
outlining the process that prospect can expect to gain the information they are
looking for .
2. New Task or New Appointment -
For a Landscape Designer to follow up with a needs analysis and an on site
consultation.
3. New Call - To follow up with
prospect after the consultation to ensure the prospect has the necessary
information they need to make their decision and to ask for the
order.
All the Events can be assigned through the icons within the Setup
& Configure Tool shown in the tool bar below.

Each Category and Status can have
its own Events attached to it. Events are not limited to one Category or
Status.
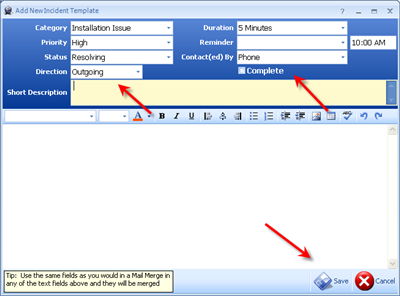
To Create a New Appointment in relation to a
Category:
This is a template for a New Appointment 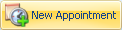 that will be generated automatically when a
Customer is created. The view to link a New Appointment is shown
below.
that will be generated automatically when a
Customer is created. The view to link a New Appointment is shown
below.
Each of the field has built in calendars
and drop down menus pre-populated with choices to specify your work flow
process.
Once you have specified the details for this Appointment the
details will be set within this template and the only details you will have to
insert later will be with each Customer will be specific to each Customer as
Sales are generated.
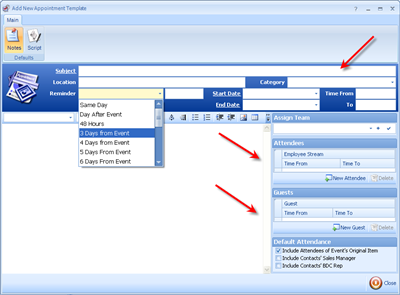
To create a New Task in relation to a
Category:
The template view for adding a New Task is
shown below.
Template details can be added into the
fields at the top of the screen. Each field has pre-populated drop down lists to
specify the parameters and time frame for this task.
Similarly to the New
Appointment, once the details are entered here the only details that will be
added later will be specific to the Customer and sales process that goes on as
you conduct business.
To Create a New Call in Relation to a
Category:
Adding a New Call Log to a Category is shown
below. This template is only slightly different to the main Call Log
Window.
This is also a Template that will automatically alert you when it
comes due as an action item that has to be completed to complete the sales
process. Like the other Event templates fields are pre-populated to define your
sales and post sales process.
When you have added the details in the
fields at the top of the window Save your changes and this template will come up
at the assigned time within a Sales/Post Sales process.
To create a New Email to be generated in
relation to a Category:
The last action item is a New Email. This can be an
assigned email with a built in message as a thank you message or as a response
further along in a post sales process.
The view of the email template is
shown below.
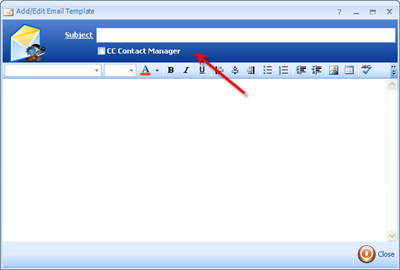
This template is general as a template and
will be sent to the Customer that it has been assigned to when that Customer is
assigned to this Category.
Save your changes when you have entered in all the
information and any message to be sent within this email. It will automatically
be generated at the assigned time when a Customer is assigned to a specific
Category.