19.3 Setup and Configure Tool- Accounting
Dec/26/2007
Accounting Configuration tools encompass Categories
related to transaction types, setup for automated processes including payment
and Shipping Services and additional tools. This chapter will address each of
the Setup and Configure tools in detail.
The Accounting Configuration Preferences are located
within the first icon on your screen from left to right. Within the Accounting
section you have the tools to add and customizes preferences
including:
- Payment and Deposit Types
- Credit Card and additional Payment
preferences
- Shipping Methods and Services
- Payment Services including Ecommerce
payments systems
- Categories and Preferences for Accounts Receivable and Accounts
Payable
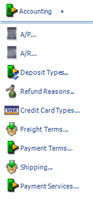
Accounting includes a number of sections that will
need to be Setup for you to use Tradepoint to its fullest capacity. The image
below shows the areas within Accounting that will require
configuration.
Once the Setup and Configuration for your Accounting processes has
been Setup you will have your transactions happen automatically as you run your
business.
Accounts Payable
The Accounts Payable setup and configure tools are
illustrated below.
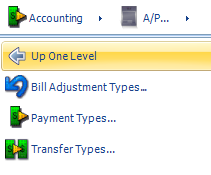
Bill Adjustment
Types - This will enable Categories within the drop down
tab of the field for Bill Adjustments. Each Bill Adjustment Type you create here
will then appear within the drop down field for Bill
Adjustments.
Payment
Types - Payment Types will pre-populate the drop down menu
for the screen for Payments on Invoices and Orders.
Transfer
Types - Transfer Types will pre-populate the screen for
Transfers within your General Ledger. When a Transfer is chosen you will have
different types of Transfer entries that you be able to make within the General
Ledger based on the Transfer types you create within the Setup and Configure
Tool.
Accounts Receivable
Accounts Receivable Configuration is illustrated in
the example below.
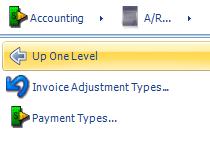
Invoice Adjustment
Types - This option will show up within Invoices for the
drop down menu for Adjustments.
Payment
Types - Your Orders and Invoices will bring up the options
you setup for Payment types within the Setup and Configure
tool.
Note:
Even if you setup all of your preference within the Setup and Configure Tool
directly here you will have the option of adding to any field where you see the
Blue Plus.
Deposit Types
Deposit Types are accessible through a drop down
tool each time a Deposit is made through the General Ledger.
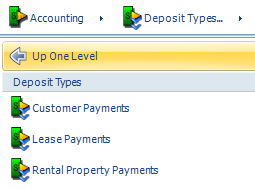
The example image above shows 3 examples of
different deposit types. A Deposit Type will be selected for each Deposit.
Creating a new Deposit Type can be done through the new icon in the lower left
corner of the Setup and Configure Tool or through the Blue Plus in the Deposit
type field within your General Ledger.
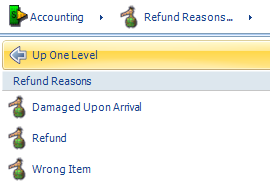
Refund Reasons
Refund Reasons defines the type of Refund you will
need to account for within any RMA processes you may have in. The image below
shows a few examples of Refund Types. The Setup and Configure Tool will allow
you to add numerous types of Refund reasons if need
be.
Credit Card Types
Credit card Types allow you to add new Credit Card
Types which will flow through to Invoice and Order payment options within the
drop down menu of the payment screen or either of those
functions.
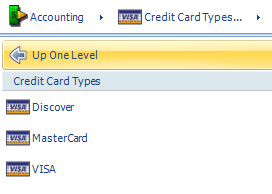
Clicking the new Credit Card Type icon 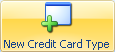 in the
lower left corner will open the window to specify the Type of Card, number of
Digits on the card and the number of digits for the Security Code on the back of
the card.
in the
lower left corner will open the window to specify the Type of Card, number of
Digits on the card and the number of digits for the Security Code on the back of
the card.
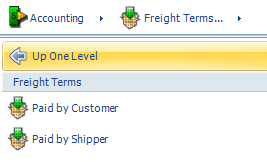
Freight Terms
Settings for Freight Term are established within
this section of the Setup and Configure Tool.
Freight Terms will show up as drop down menu items
for fields located within the Account section of a Customer, Reseller, or
Supplier as an Account preference within a Customer, Reseller, or
Supplier.
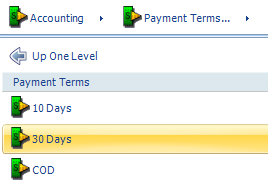
Payment
Terms
Payment terms is the preference that is setup in
this section which in turn will become a drop down menu option within Bills.
This option is customizable through the Setup and Configure tool directly or
through the blue plus found within the Bill window.
The view from a Bill is shown
below.
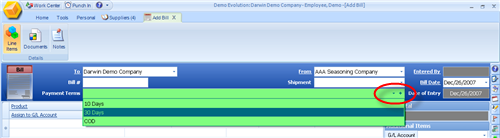
The circled blue plus in the image above will take
you to the image show below within the Setup and Configure
Tool.
Shipping
The Setup and Configure Tool includes preferences
for live shipping modules and related preferences as well as shipping tables
that can be created should you lose your Internet connection for any length of
time.
The Shipping sub-section of the Setup and Configure
Tool includes two sections to be configured to setup your
shipping.
Shipping Methods: This will allow you to configure a live shipping
module as well as related preferences.
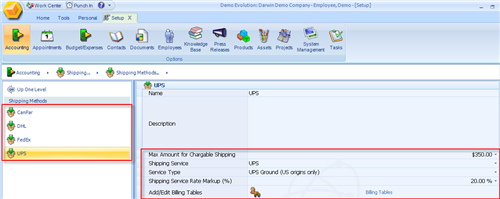
This example shows several existing Shipping methods
and individual preferences related to your Shipping Method on the right of the
screen view.
Max Amount for
Chargeable Shipping - This Preference allows you to provide
free shipping for Orders higher than a specific amount. The example above shows
that all orders up to $350 will be charged shipping and anything above that
amount will be Free Shipping. When this preference is set all Orders past that amount will not be
charged Shipping. This setting will have to be set with all shipping carriers
you have setup within your Tradepoint.
Shipping
Service - This is the live Shipping Service you have set up
within your Shipping Services. When you setup your Account information for the
live shipping service (with your login and password) the live shipping Service
will pull the live shipping data specific to your Account into each Order and/or
Invoice. The drop down menu here will show the live shipping modules available
within Tradepoint. Choose the one that corresponds to this Shipping Method you
have created.
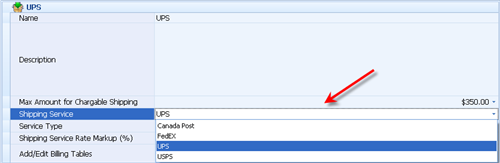
Service
Type - The Service Type include a drop down menu of all of the
service types provided by that carrier. Choose one for this Shipping Method that
you have created. In the case shown below multiple shipping services are
available to you.

If you use multiple shipping services for one
carrier you will need to Setup and Configure each Shipping Service within a
Shipping Method. In the case shown above all the available shipping services
offered by UPS are available within this drop down menu shown in the image
above.
Note: If you use UPS
Overnight Air, Two Day and Three Day Service you will need to have a Shipping
Method configured for each of those Services. The result will be seen in Orders
where the customer preference will be picked up automatically within their
Orders if the preferred shipping has been specified within their Account or when
if they became a customer through the web portal.
Shipping Service
Rate Markup - This is a markup that can beaded to your shipping
to cover and handling fees. If there is any percentage specified within this
field then all Orders for this Shipping Method will automatically have the
increase in price added to the overall shipping
cost.
Add/Edit Billing
Tables - Should you lose your Internet connection and are
unable to receive live shipping data you have Billing tables that can be added
to provide shipping rates based on weight and destination. Most carriers provide
online shipping tables for each of the services they offer. The example shown
below is a ficticious example to illustrate the functionality of the Billing
Tables.
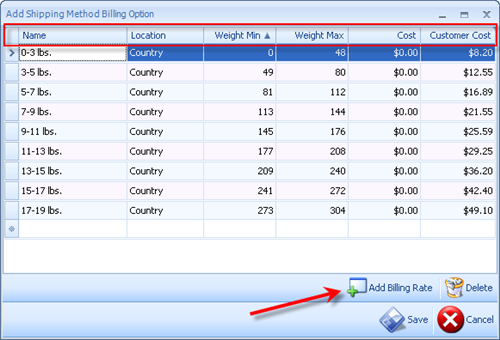
This table has to be manually entered based on
information available from the different carriers. A few things to remember
about this table structure:
- The name field designates the weight
range. This can be different from a table provided by your shipper for smaller
(and as a result more accurate weight ranges) weight ranges. If you choose a
different weight range than what your carrier provides you will have to
calculate the Min and Max weight.The Location field provides
options for destination. The other choices include City, Province/State and
International. If the carrier uses ranges(most do) then choose the National
setting and one of the higher ranges for more accurate approximation for your
tables.
- Weight Min/Weight Max will be the
increment of weight for the range in a field. The example above shows Pounds
and the Weight Min/Weight Max broken down into ounces for more accuracy. These
fields have built in calculators that will allow you to use the mouse or the
keypad on a keyboard to perform calculations.
- The
Cost(to you) field in most cases will be blank since shipping is something
that is paid for after the fact.
- The Customer Cost field will be the
cost to the customer. This will pre-populate in the Order or Invoice based on
the weights attached to your Products from your Inventory and will be
generated automatically should you not have an Internet connection for live
shipping data.
Save your changes when you are done. Otherwise all
the data that was just entered will be lost and have to be re-entered
again.
Note
- Billing Tables are OPTIONAL and not required. It is designed
to be a fail safe for automated live Shipping tools or is designed to be a
manual shipping process for businesses that are service oriented or who do very
little shipping.
Shipping Services
Shipping Services works in conjunction with Shipping
Methods. The shipping Services will specify the details of the electronic
Shipping Services you require while the Shipping method will include details
about your overall Shipping needs and not just the configuration for the
electronic component for the live shipping.
The
image below shows an example of one automatic shipping option. Depending on the
requirements of the carrier the fields may vary somewhat.
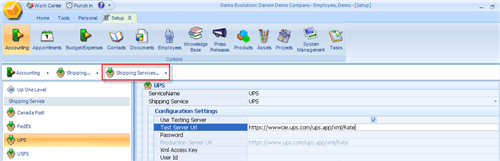
The Carrier's Server information will be
pre-configured into some of the fields and you will have to enter in any login
and password information necessary to access your specific shipping information
for that carrier.
When you have entered your Account login information
your changes will be saved automatically. Now whenever this shipper is specified
or if this Shipper is the default then the rate will be generated automatically
based on your preferences setup within the Setup and Configure
Tool.
When you close the Setup and Configure window your
changes will be automatically saved.
Payment Services
This is where your settings (login information,
etc.) for your electronic or web payments are entered into Tradepoint. Once this
is entered here then electronic payments are processed based on the preferences
set within the Setup and Configure Tool.
Your established preferences will flow through to
the respective screens for web and phone based Orders, and the result will be
the functionality for your electronic payments will become
active.
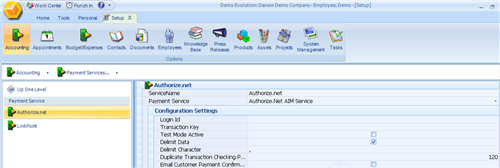
The example above shows a basic field set for
Authorize.net. This structure allows for a test mode to test out your payment
system before you go live and will also be controlled by security settings for
after you go live.
When all of your payment services have been
established you will have these options show up within the Payment Information
section within Orders as a part of the drop down menus available for taking
orders and will also appear automatically within your Ecommerce module for any
online transactions.
Related Articles
<Articles>