2.9 Iconography within Tradepoint
Apr/11/2007
Tradepoint uses an
intuitive interface with Ribbon styled tool bars and iconography throughout
the application. Iconography on the Tradepoint interface provides functionality
to multiple tools at any one time.
To illustrate the functionality of
the iconography within Tradepoint we will go through several screens to show the
structure and function of the different tool bars throughout
Tradepoint.
Below is a screen view of the main
screen of Tradepoint with the Work center enabled and the different groups of
icons highlighted.
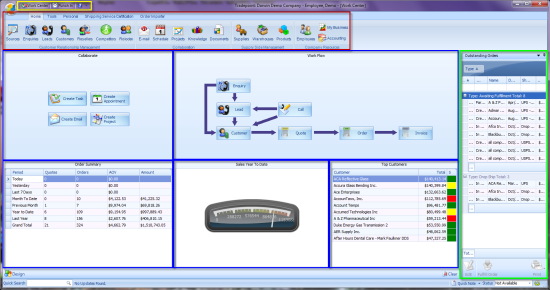
Three tool bars exist in the Main
tool bar menu at the top of the page. Home, Tools and Personal can be accessed
by clicking the tab. Below are screen views of each tool bar.
Home Tab tool
bar - Highlighted in Red - This tool bar will be found
throughout Tradepoint and can be accessed by clicking the Home
tab.The main icons you will use on a daily basis to manage your business
the most will be found here. The configuration and/or available icons will be
determined by User Access Settings therefore not all of these icons will
necessarily be available when a User logs in.

Tools Tab- Most back office functions involving the setup of
Tradepoint for your company will be found on this tab.

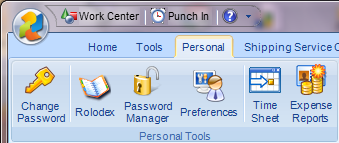
Personal Tab- Each User profile
will have a Personal Tab with functions such as a personal Rolodex, Password
Manager, Preferences and Time Sheets that will be specific to the User Access
settings of the person logged in.
Customer
Relationship Management - All of your CRM needs are addressed with
the functionality in this section from the beginning of the sales process with
Sources, to managing marketing needs with Enquiries and Leads, the sales and
post sales process with customers and managing indirect sales through Resellers.
A Rolodex is available here with contacts used on a company wide
basis.
Collaboration
- Within Tradepoint diverse functionality is accessible
throughout a business management application. These tools can be accessed
throughout Tradepoint in numerous locations. Whether you are in a Suppliers
account and need to start a Project associated with their file, attaching a
document to a Customer's file or need to send an email to a
Lead and you are in the the Lead's account Collaboration allows you to
do just that Collaborate.
Supply Side
Management - Complete Inventory Management is
integrated here with the ability to manage Suppliers and the warehouses
where your Inventory is located. Add to this the ability to manage Product
listings on your website of you are using one of our E-commerce Web modules as
well.
Company Resources
- Human Resource Management is a complete tool for Managing your
Employees and their data and activity histories within Tradepoint. Even though
reports can be generated from multiple Access Points within Tradepoint the
XtraReports Writer is accessible here. Accounting functions can be performed in
multiple locations relevant to that file you are working with directly however,
the General Ledger is accessible within Company Resources.
The two red arrows indicate two
other tool bars with different functionality than the Home tool bar.
Tools has functionality addressing numerous back
office functions such as Security Settings and Templates. The
Personal tool bar will have functionality
available to the User Access settings of the person logged in including a
Personal Rolodex, and Password Manager.
Work Center -
Highlighted in Blue - The Work Center is available through the main screen
or by clicking the Work Center icon in the Quick Access tool bar.This is a
customizable tool based on the work flow process within your company. The three
main sections indicate the type of function available through that group of
icons.
Workflow - Each of
these icons will open the screen to that functionality. Contact information can
be assigned to each action as it is created. An example would be an order can be
taken immediately and the Customer information can be assigned after the Order
is taken or a new Customer can be created after the Order has been
taken
Collaborate -
Each of these icons will allow you to create the specific function
of the icon. Any contact or employee information can be assigned after the
fact.
Find -
Direct Searches within any of these types of
data.
Flyout
Panel - Highlighted in Green - This tool will be present
throughout Tradepoint on the right hand side of the screen. The icons
expand with the type of information they hold. Each icon will contain reminders
about the processes, tasks, orders, emails, RFQs that require immediate
attention. The purpose of the Flyout Panel is an internal Reminders system
available for common business activities.
Quick Access tool
bar - Highlighted in Yellow - This tool bar will be found
throughout Tradepoint when any screen is opened. This will contain the
icon for the Work Center, Punch Clock and Interactive Help icon. The Quick
Access tool bar can be customized with the icons you use the most by right
clicking on the small arrow you see on the far right.
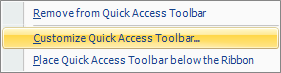
The Quick Access Toolbar can be customized to add or
remove functionality by right clicking on the drop down arrow on the right side
and choosing the functions to add or remove to the tool bar. Any customizations
will appear in the tool bar at the top of the page.
Choosing the Customize option will open the
following window.

Going into Tradepoint to show further the
functionality of the iconography are two examples of window layouts. The main
window template used within all contact pages including the Customer
Relationship Management, Suppliers and Projects is shown
below.
Your Flyout Panel icons will appear as you see below
and will be accessible from every screen within
Tradepoint.
This is the main structure you will see for the
majority of the screens.
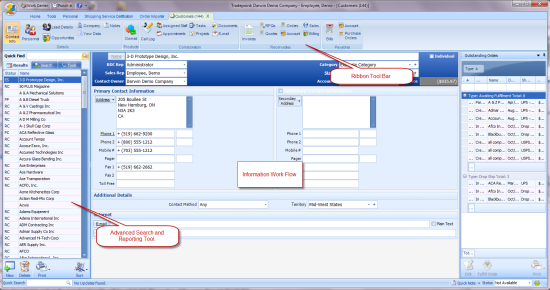
This format will be consistent with the three main
areas of functionality within the; Quick Access Toolbar, Ribbon-Styled tool bar
and the main Contact Information section. You will also find the Flyout Panel present on the far right
side of the screen accessible by clicking any of the icons you
see.
Another key example of the iconography within
Tradepoint can be found on this next page. Within any given contact you will
have sets of relevant icons for functionality specific to that contact.
Icons will be at the bottom of a page either on the
left within the Quick Access Search Tool or on the right within the Contact
Information details.
What is important to note is the icon functionality
will be related to the section of the page they are located in.
Fore example, on the screen view below if you are
looking to add a Personnel contact to this Contact you would use the icons on
the lower right side of the page. If you were looking to start a New Contact
entirely you would use the New icon within the Quick Access Search
Tool.
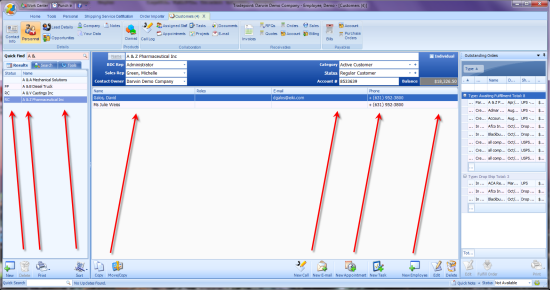
The icons within the Quick Access Search Tool on the
left will be relevant to the section of contacts you are working in. If you are
looking to Create a New Contact, Delete a Contact, Print a Contact or Sort a
Contact by the choices available in the pop up menu then use those
icons.
If you are looking to perform any of the functions
listed on the lower right in relation to the personnel attached to this contact
then use the icons on the lower right side of the
page.
This is important also if you are looking to Delete
a Personnel contact within a Contact: use the Delete icon on the lower right
corner. The Delete icon on the lower left will delete the entire Contact since
it refers to the overall contact and not the Personnel Contacts listed within
the Contact.