5.17 Mass Email Campaigns - Part 2 Creating a Mass Email
Apr/18/2010
A few things to remember about mass emails before
the steps are outlined:
1. For mass emails to work in Tradepoint at least
one active email account must be setup within the Employee profile that the
user is logged in under. If one or more email accounts are setup under the
employee profile that a user is logged in under then those email accounts will
appear in the drop down menu to choose from in the Mass email tool.
General accounts such as sales@ or info@
email accounts can be setup under multiple email profiles for the purpose of
sending mass emails with a generic return email address.
2. Tradepoint's Mass Email Tool will look to use the
Incoming and Outgoing Mail Server information attached to the email account.
For companies who do not have dedicated mail servers or do not
have agreements to send mass emails through their ISP, please know that sending
out mass emails can get you black listed depending on your ISP and email
configuration.
3. Tradepoint's mass Email tool does have some
protective mechanisms built into the mass email tool to protect against being
blacklisted. They are:
- A preset limit of 20 or less for sending out
emails in a group. Using this setting will send out emails in groups of 20 or
less(this setting can be adjusted) when finished.
- Tradepoint's mass email tool does not support
sending out attachments on mass emails. Most paid mass email services do not
support this feature either.
- A link can be created and embedded within a
mass email to download a file through clicking on a link.
- A link can also be created in a mass email that
can be tracked as tow ho downloaded the link. We call this a resource and is
part of the mass email wizard.
4. Email templates can be used for easier content
generation in the mass email tool. Both HTML and text based emails are
supported. Merge fields (also called replacement fields can be used for creating
merged fields in each email). Email templates are setup under the emails icon
under the tools tab.
Sending a Mass Email through
Tradepoint's Mass Email tool is done by following the steps outlined
below.
1. After performing a search so the search results
are listed in the advanced search tool in contacts, click on the tools tab. The
mass email tool will be under this option.

2. The search results will show on the first screen
in the Mass Email tool. These will be the contacts receiving the email.
Options are there to Clear All, or Check All for the contacts listed.
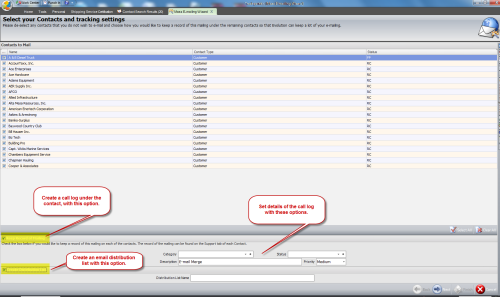
An option to create a call under the contact is the
first option at the bottom labeled "Keep Record of Mailing". This option will
require a Category, Status and name for the Call and will appear under the
contact record once the email has been sent
The option to "Create a Distribution List" will
create an email distribution list for outgoing emails which can be found in the
address book for outgoing emails.
3. The next option will prompt to choose who the
email goes to. Since Tradepoint supports business to consumer and business to
business contacts as well as categorizing contacts within business to
business contacts, a number of choices are available in the drop down menu on
the next screen.
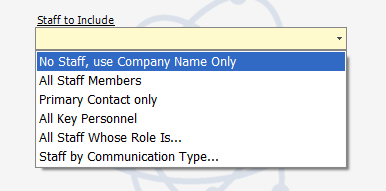
No Staff use Company Name
Only - This option is for use with all business to consumer
contacts and all business only contacts. The fields that are being picked up on
for this option is the email field on the main contact screen for businesses and
the main email address on the Contact info screen of Business to consumer
contacts.
This is the best
option for business to consumer contacts.
All Staff Members - This
will send the email to all staff members of business to business contacts.
This option is for business to business contacts only and will not
work for business to consumer contacts.
Primary Contact Only -
This option is for business to business contacts that have been checked off as
the Primary Contact of a business to business contact. This option
is for business to business contacts only and will not work for business to
consumer contacts.
All Key Personnel - This
option is for business to business contacts that have been checked off as
the Key Personnel of a business to business contact. This
option is for business to business contacts only and will not work for business
to consumer contacts.
All Staff whose Role is ... -
This option is for business to business contacts that have been
checked off as the specific role of a business to business
contact. There is a prompt for a specific role after this option is chosen
to specify the role. This option is for business to business
contacts only and will not work for business to consumer
contacts.
Staff by Communication Type...
- This option is for both business to business and business to
consumer contacts that have been checked off as receiving specific
communications.
This option is for both business to
business and business to consumer contacts.
4. The next screen has options for sending the
email:
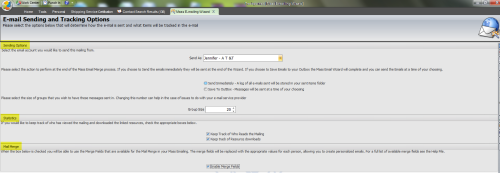
Any email accounts attached to the employee login
which is signed in under will appear in the drop down menu at the top of the
screen as sending options for the mass email. if there is only one email account
then that will be the only option.
The default sending option will be to
Send Immediately. A second option is listed below to
Send to Outbox which will send ALL messages to the
outbox for sending later. This option will require a Send/receive at a later
time to send out the messages.
The default mailing option will be set at 20
messages. This option will define how large the groups are and can be adjusted.
We highly recommend the email groups be 20 messages or smaller.
Options to keep track of who reads the mailing
and who downloads any resources will show up in the calls that are tracked to
contacts. For this option to track these statistics, the option in
step 2 for Keep track of Who Reads the Mailing has to be chosen previously.
The option to enable merge fields has to
be checked if merge fields are being used. See documents for available
merge fields for Mass Emails.
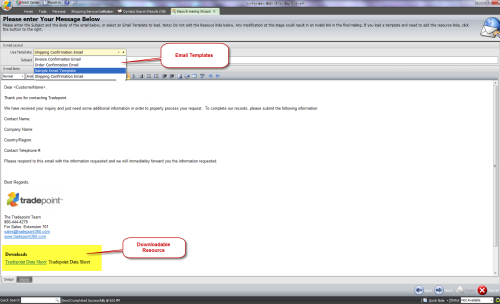
5. Add Resources (links for downloading
files)
Add one or more resources to be downloaded by
entering in the information to create the link to the resource:
Resource Name - this will appear as the name of the
link
File Address - for example http://www.tradepoint360.com/documents/tradepointfunctionality.pdf for
a PDF file
Download Description - Description which will show up next to the
link of the file to be downloaded

6. Email Content - Emails content can be generated
at the time of the mas email or email templates can be used. Email templates
have to be setup prior to generating the mass email to be available as a choice
in the drop down menu.
7. Send message by clicking Next.
Any calls will be found under contact files under
the Call Logs icon.