Attaching documents to your
Appointments can be done through the icons shown in the top of an Appointment
details screen.

The Documents functionality within
Appointments will be identical to adding a document to a contact, product or
project.

Clicking on the Add New Document icon in
a contact, task, appointment, or Project will open the Add New
Document window allows you to create a new blank document, create a
document from a template, or import an existing document.
Within Tradepoint entering a
document can be done in several ways through Tradepoint. The main screen to
enter a document in is shown below.
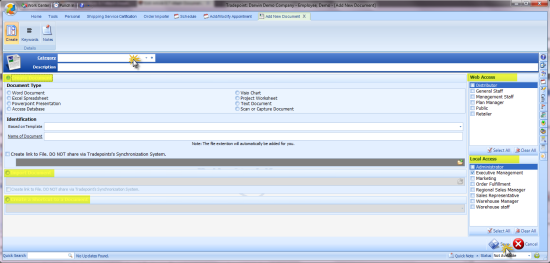
Document categories are established at
the top of the page. The blue plus will open the Setup and Configuration tool
enabling you to create detailed Categories.
Security Settings are available if you
are using one of our Web Modules(labeled Web Access) and for the local
application(labeled Local Access).
Tradepoint natively supports a large number of file
formats for advanced functionality. For other document types you can import the
documents and the system will automatically open and save them correctly into
the database for you.
When creating a new document the file extension will
be appended automatically for you. Also note that regardless of whether you are
creating a new document or importing an existing one, it is advisable to enter a
description and optionally a category in the bottom section of the window so you
can easily locate the document once it has been saved into
Tradepoint.
New Document
To create a new blank document, ensure that the New
Document option is selected. Then select the type of document you would like to
create and enter a filename in the Name of Document field (without the file
extension). It is also advisable to enter a description and category. When this
information has been entered, click the Save button and Tradepoint will launch
the appropriate application with a new document.
When you save and close the document, Tradepoint
will save the changes to the database.
Existing Document
To import a document from your computer, select the
Existing Document option. Click the file folder icon to open a file browse
window, and locate the document you wish to import. When you have selected the
file, enter a description and category and click the Save button.
Document Web Access Settings
If you are using one of our Ecommerce solutions,
documents can be made available online and control who can see which files
simply by checking off the web access types that you wish to have access to the
document. If you do not want the document to be available online, simply ensure
that none of the check boxes are checked.
How Tradepoint maintains files
Tradepoint opens documents automatically using the
default application for whatever type of document you select to open. Once the
document is opened, Tradepoint monitors the documents and waits for it to close.
When the application that opened it is closed, Tradepoint will check to see if
any changes were made and pull the updated document into the
database.
While the system is monitoring the file that you
have opened, you can freely open other documents, and use Tradepoint as you
normally would. All monitoring happens in the background with no impact on you.
If you have documents open when you close Tradepoint you will be prompted to
save and close the documents before exiting Tradepoint to avoid loosing your
changes.
Further Help Articles on each of these
functions will walk you through each of these processes in
detail.
When documents have been entered into Tradepoint
they will be structured by type within a given location in Tradepoint. Below is
an example of a document structure attached to a contact(in this case a
Customer) file.
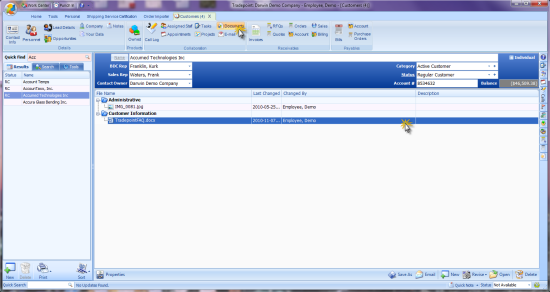
These views will be consistent
throughout Tradepoint when you open the documents whether it is through a
Customer, Lead, Supplier, Project or attached to a Task or
Appointment.
Document revisions are visible and
tracked through this page with the User Access Settings of the individual . They
will be listed in a stepped format in chronological order.
When a Document is highlighted the remaining icons
will become live and you can then choose if you would like to open or create a
revision from an Existing document.
When the 'Create Revision from Current' icon is
chosen the highlighted document will open and you will be able to make the
necessary changes to the specified document.
The Revised document will be attached to the
original in a stacked format time and date stamped with the User Access Settings
of the individual who made the changes.
Scanning a document is done through the
New Scanned Document icon.  This will open the wizard where you can
scan in a document through the drivers of the scanning device attached to your
computer. Tradepoint will automatically look for any device attached to your
computer.
This will open the wizard where you can
scan in a document through the drivers of the scanning device attached to your
computer. Tradepoint will automatically look for any device attached to your
computer.
The wizard to Scan in a Document will
look for any device attached to your
computer.
Below is an example of the window where you
will be able to scan in a document.
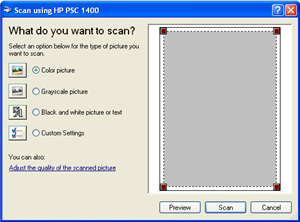
Scanning functionality is in the tool bar at the top
of the page. A Document description and Category can be set towards the top of
the page. When you have scanned in your document you will be prompted to Save it
at the bottom of the page. You also have the option to Print a scanned document
at the bottom of the page.
Your documents will appear within the Appointment
under the Documents icon in the same fashion shown below.
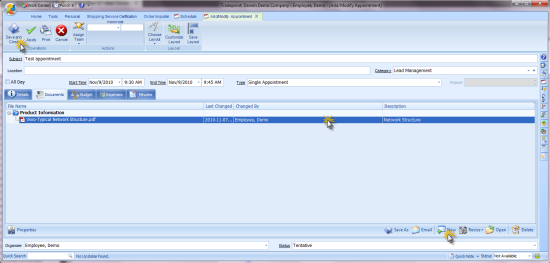
Provided the security access for the attached
documents permit, everyone associated with the Appointment will have access to
the Documents.