The Projects screen lists all of the
projects that are associated with the contact so that you can track your
projects related to the contact.
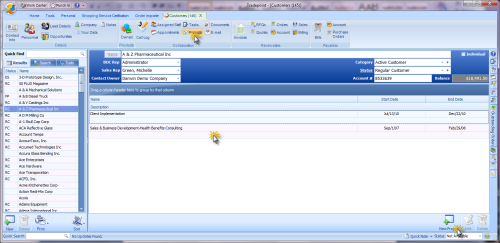 To create a new project,
simply click the New button or use the Projects button from the main tool bar.
To ensure that the project will be listed with the contact, make sure that under
the Project Team you enter the contact or set this contact as the Potential
Customer of the project.
To create a new project,
simply click the New button or use the Projects button from the main tool bar.
To ensure that the project will be listed with the contact, make sure that under
the Project Team you enter the contact or set this contact as the Potential
Customer of the project.
Tradepoint has
integrated Project Management into the Windows application. From the
customer section multiple projects can be linked to a Customer account. A new Project can be started from the
Customer account as well.
Tradepoint's Project Management encompasses
Overview, GANT charting for time lines, built in reminders and alerts for action
items such as Tasks and Alerts, the Collaborative Schedule, Personnel Management
for teams involved in a given Project, Accounting functionality to manage
expenses and budget parameters for a project, Document Management and
email.
We will address the main functions available within
projects in this section. The screen view below show the view through Customers
of Projects. This is where projects will be listed when they are within a
Customer Account.
Project
Overview
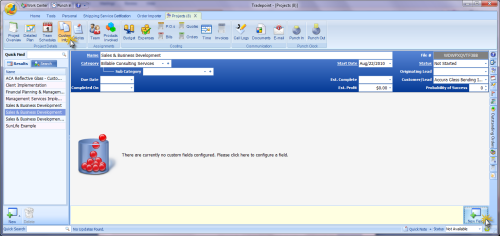
Clicking 'New Project' will open the window you see
below. This is a test Project with False Data to illustrate the functionality in
Projects when its in use.
Within the Word Editor you have general
functionality available for an Overview and you can also cut and paste images
and other types of Documents such as Excel spreadsheets.
The screen view below shows an Over view for a
project.
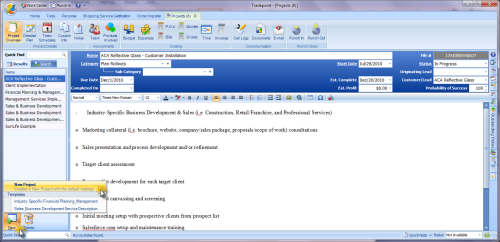
Parameters for the Project are established by
filling in the fields at the top of the Overview screen for Due Date,
Categories, Sub Categories, Estimated Profit, Status, Probability of Success and
any originating Customer/Lead information.
Project - Detailed
Plan
Tracking a time line within a project is critical to
being able to track progress. Add to the in-depth functionality that tracks
Tasks, Appointments over time and
reveals a time line that Reminders can be built into is just a small part of the
functionality within Projects.
The screen view below illustrates one view of the
detailed plan. Each Task and Appointment is both set up in this format with main
details listed and priority being established from the Top indicating the start
of a Project.

Any Child Tasks or Child Appointments will appear
linked to the Parent Task or Appointment in the same fashion you see in the
charting structure you see above.
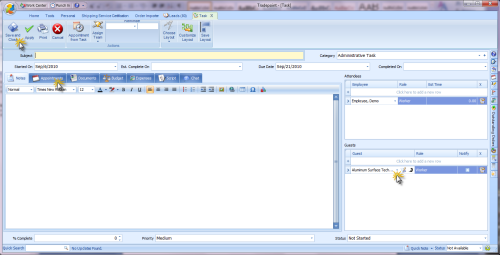
Creating a New
Task or Appointment will open a window that looks similar to the one on the page
below. Simply fill in the appropriate fields and your Task or Appointment will
automatically be saved in the treed outline for a Project.
Importing an existing Task or Appointment can be
done by clicking on the Import Task Icon. When you hover your mouse over the
icon it will appear as you see below.
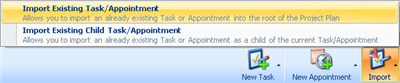
When you choose whether the Task/Appointment you are
Importing is either a Parent or
Child Task/Appointment the following window will open with all related existing
Tasks and Appointments to choose from.
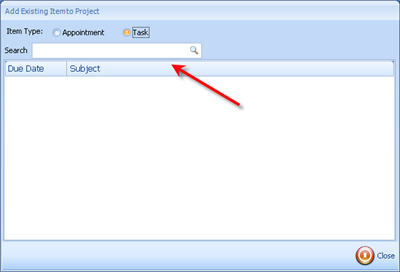
Highlighting the necessary Task/Appointment
and clicking Save will add the Task/Appointment to the treed chart for a
Project.
Projects - Team Schedule
Since coordinating efforts for a Project usually
requires the efforts of more than one individual, being able to see their
schedule just a click away is important especially when scheduling action items
that involve more than one person.
We have created Tradepoint so the Schedule for
Assigned Staff for a Project can be visible within that Project. Any Appointments set will in the main
Schedule and in any assigned projects as well.
If there are multiple individuals assigned to a
Project then you will see multiple schedules listed here.
Projects - Custom
Info
Projects also includes a section for Custom
Information. This can be anything but is typically specific data to your work
flow and products and/or services you provide.
Examples include IT based information such as
Computer and Network Requirements for an Installation, Specifications for
Industries such as Building Construction,
Architecture, Water and Soil testing, Accounting, Legal, and Patient work
flows for Medical Practices in specialties such as Orthopedics.
Below is the screen where these Specifications will
be structured and listed.
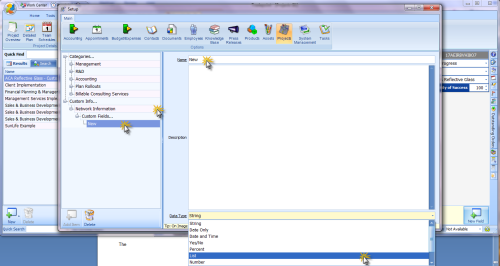
One thing to remember is that when you start a
Custom Field within windows you are in fact bringing up the Setup Configuration
Tool that is also found in the drop down menu when you click the Globe in the
Upper left hand corner of your window.
To create a new Custom Field click on the Custom
Info Icon next to projects. The window you see below will open allowing you to
name a Custom Field and assign the appropriate properties(numeric, alpha
numeric, financial, etc.)for that field.
Projects -
Teams
Assigning a team to a project both within your
company and with contacts from your client company as well is important to
streamline communications and have everyone be able to function and keep current
as action items are completed.
This screen shows the drop down menu that you can
assign teams both internally and with clients. The process is the same to
establish teams internally or externally.
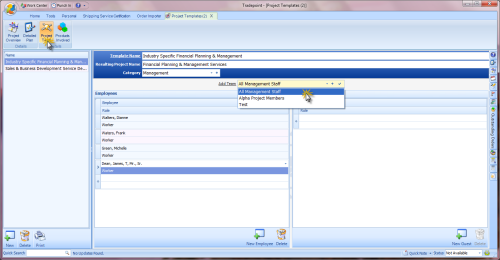
Once teams are established the schedules of each
individual will be viewable within the Schedules sections of
Projects.
Projects - Products
Involved
This section is modeled after the Products Owned
section within the Customers. You can keep a record of any Products Owned by a
Customer within a Project. Products Owned would be any product or service you
charge for . Additional information regarding Inventory and Supply Side
Management will be addressed in a separate Help File Tutorial.
If you are a company with a large number of products
and/or services only the first 20 will automatically come up. Simply typing part
of the name or an item number will bring up any items beginning with the letters
or product numbers you enter.
Essentially the Advanced Search functionality in the
Search Tool is also included in any drop down list where inventory is
stored.
Projects - Budget
The Budgets section within projects helps you track
any outstanding budget items for a related Project. Whether it is projected
budget for hours, budget items for products or any ongoing fees related to the
project they will be listed here from top to bottom on the main window
below.
Any budget items will be listed below and similarly
to other windows clicking on any one of them will open a window with further
detail available.
The screen view below gives additional
information.
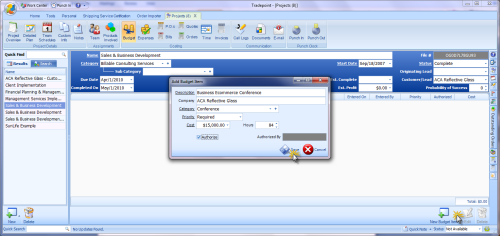
The 'New Budget Item' icon in the lower right hand
corner opens a smaller window on the next page allowing you to specify
additional details.
Categories can be set along with authorization by a
specific individual if necessary. Each Budget item that is added will then be
listed in the main Budget window .
Projects -
Expenses
Expenses within Projects can be tracked in this
section. Similarly any outstanding expenses will be listed here in the window
below in the same manner.
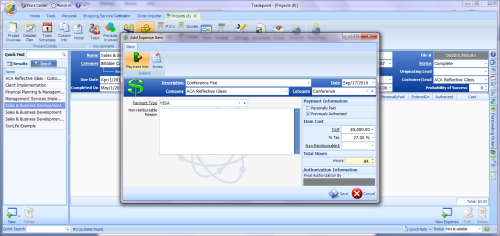
Clicking the 'New Expense' Icon will open the
smaller window you see and you can enter in any relevant details for that
expense. A screen view of the Expenses screen is shown below and is designed in
a similar format to the budget screen.
One important thing to note about both the Budgets
section and Expenses within Tradepoint is that depending on a user's security
settings these sections can be made visible to only authorized
personnel.
The last two Sections within Projects are Documents
and Email. The Documents section is identical to the Documents sections found
elsewhere in Tradepoint with the same full functionality for scanning, importing
and creating new documents.
The Email section within Projects allows email to be
sent to the group assigned to that Project and not just storing related
emails.
Projects-Time
Tracking a budget, expenses, and billable hours is
crucial to accurately planning and managing a Project. Within projects is time
costing allowing you to track who has been putting time in for a project, what
their billable rate is per hour, and the totals for billable hours that a client
can be billed for.
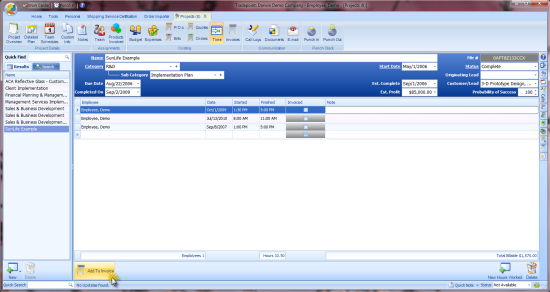
As hours by assigned Employees are added they will
be listed in the order they start by date. The totals of hours, number of
Employees, and the amount of billable hours that a client can be billed for will
be tracked in the fields at the bottom of the window.
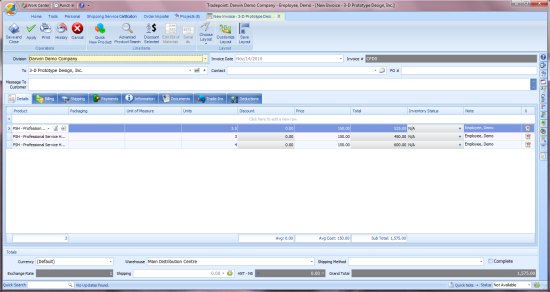
At the bottom of the screen you see above is an icon
that will allow you to generate an Invoice from any existing Billable Hours
logged by any or all Employees. Simply highlight the set/s of hours and
click the 'Add to Invoice' icon and an Invoice will be generated for those
hours.
As hours by assigned Employees are added they will
be listed in the order they start by date. The totals of hours, number of
Employees, and the amount of billable hours that a client can be billed for will
be tracked in the fields at the bottom of the window.
Projects-Documents
Documents can be stored in a Project using the same
format and functionality as in other sections of Tradepoint. The main page for
Documents in a projects will look like the screen you see below. Any Documents
already existing in Tradepoint will appear in the format you see below based on
any categories you have created.
Its important to remember that the data compression
ratio we use in Tradepoint is approximately 12:1 with a consistent performance
of 10:1 so, many Office based and PDF documents can be stored with the exclusion
of Autocad and most image files(which we recommend you setting up a link to
those files and storing them on a separate device such as a Sever).
Adding a New Document will open the window you see
on this page. You have a choice of creating a new document, establishing a link
to and existing one or importing an existing document from your hard
drive.
Projects-Email
Tradepoint provides you with the ability to track
email communications that are specific to a given Project. The window for this
is shown below. Any existing emails will be listed in chronological
order.
Since email is inherently personal assigning an
email to a Project has to be done from your main email screen as they come into
your Inbox or assigned Folder. From the Main Email section right clicking on an
email will open the drop down menu you see below.
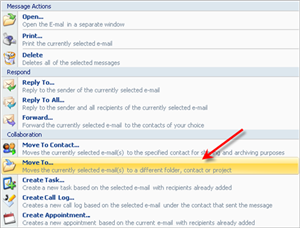
Right clicking on any email in the main email
section will enable the above functionality in a drop down menu. From the drop
down menu above choose the highlighted icon to move an email. A smaller window will open with several
choices of where to move this email.
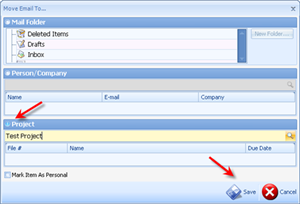
Clicking on Project will allow you to view all
Projects that you have User Access Settings for and you can then move a specific
email to a Folder, Contact, Customer or in this case a Project.
Projects -Punch
Clock
Earlier in Projects tutorial we went through the
Time Costing function of Estimated Billable hours for a project. The Punch Clock
within projects is the tool for tracking actual hours spent on a project. Using
this is quite simple.
If you are in a project that you are going to be
working on simply click on Punch In and your time will be logged from the minute
you have Punched In. It is the same for Punching Out when you are within a
Project.
Another way to Punch in can be done by clicking on
the Time Clock icon at the top left side of the screen in Tradepoint. The time
clock will open and look like what you see below.
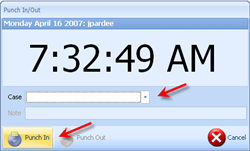
The Project(which is labeled Case) is for the Test
project we have used to illustrate the functionality within Projects. An
Employee has already Clocked In due to the highlighted Punch Out Icon being the
live icon available.
To show additional Projects you have user access
permission for simply click the small arrow on the right side of the Case
field.
From there when you are finished working on a
project simply click Punch Out on the Punch Clock.
You will know if you are punched in or out by which
icon is live on the Time Clock. You can always check to see if you are still
clocked in by clicking on the time clock in the upper left hand corner to make
sure.