The Documents screen allows you to
manage any files that you have for a specific contact. You can manage scanned
documents from this screen as well, which allows you to scan in any document
from a compatible scanner and store it in a highly compressed format under that
contact while still maintaining quality.
Tradepoint has Document management
Functionality available throughout the application is sections such as Leads,
Customers, Resellers, Competitors, Rolodex, Suppliers, Projects, Tasks,
Appointments, Call Logs and more. The interface and built in functionality
will be consistent in each of these sections allowing you to create, store,
manage and change the documents you attach to a specific file throughout
Tradepoint.
Document Management
One of the biggest myths about computers and how
they would effect our ability to manage businesses at the time they
were emerging on the market was they would eliminate the need for
paper documents. This myth also extended to use of the Internet and business
management software applications. Obviously our ability to generate documents as
all of these technologies have developed has only increased. The use of
Documents has only become more detailed and specific as our technologies have
developed to create and manage
information has also become more detailed and specific.
Up until now what hasn't happened is the development
of a documents management program that addresses the diverse categorization
needs of document management with the ability to manage documents
electronically and physically.
Within Tradepoint is the ability to manage, store,
create documents specific to type of Contact and to the use of the Document.
Tradepoint also gives you the ability to track any changes to Documents by user
access settings every time there is a change to a document. Document management is embedded
throughout Tradepoint allowing you to access the same functionality within various sections of Tradepoint.
What this means is when you are accessing documents
within a Customer's file you are accessing the documents specific to that
customer that are stored with a categorization structure specific to your
organization. The same goes for a Lead, Supplier, Reseller, Employee, Project
and numerous other places such as within Notes, Tasks, and Appointments. Within
numerous sections of Tradepoint you will be able to access the same functionality
however, the documents you access will be specific to that type of action or
contact.
Global Documents accessed from the Home toolbar also
has the same Document Management Functionality built in and is designed to
manage general documents that everyone within your organization will need to use
and is able to access.
The icon for Global Documents is found in the
Collaboration Section of the Home Tab.

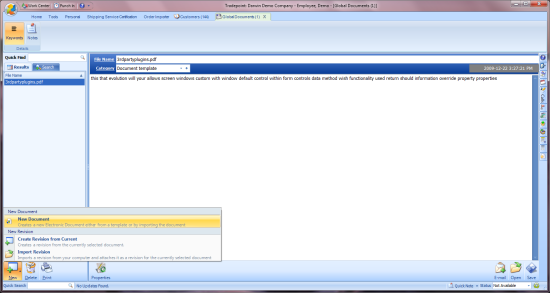
Global
Documents
Global Documents is slightly different since they
are designed to be accessed by multiple users. The Main page will allow you to
Search for Documents by title or list all of them on the left hand side of the
page with the Search Tool. Since User Access Settings have to be created for
each document all General Documents
can be stored here and each User can have the convenience of accessing
any documents specific to their user access settings. The screen view below
shows layout of the Global Documents Page.

The 'New' icon will open a pop-up menu with the
options available for the type of New Document you can create. This Pop-Up menu
is accessible anywhere you go to create a new document not just in Global
Documents.
Each selection is self explanatory and will
automatically begin the process you
selected.
A New Scanned Document will automatically open a
wizard that will then attempt to locate a scanning device attached to your
computer. Creating a Revision from a Current Document will automatically open
the document you have highlighted. When you are finished it will be saved and
linked to the original document with the time/date stamp information of the
person who made the changes to the document.
Importing a Revision will allow you to Import a
revision of a Current document from your hard drive instead of making the
revision directly from a specific document
within Tradepoint as in 'Create Revision from Current'.
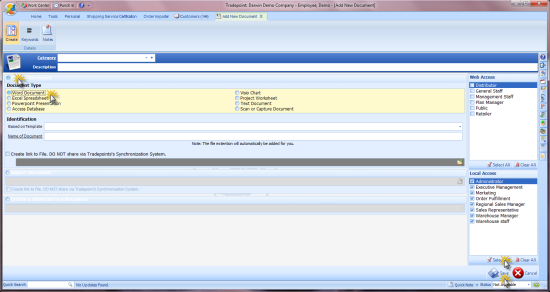
Creating a 'New Document' opens a window with
options for a 'New Document'. The main window is shown below.

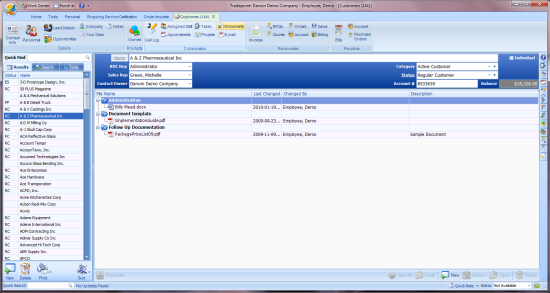
This is the view when accessing Documents attributed
to a specific Customer. In each section where you have document management
functionality you will see the same window with the same appearance. The only
difference will be the documents themselves will be specific to the section
and/or action they are related to.
The Categories you see above(Administrative
Documents, Legal and Marketing) are all created from the Setup and Configuration
Tool which can be accessed from the blue plus in the right side of the
Categories field towards the top of the window.
Opening the Setup and Configuration Tool from this
section will take you to the window that will allow you to make adjustments to
the categories field for Documents only. You can of course make adjustment to
additional fields elsewhere within Tradepoint from this same section. Additional
information about the flexibility with the Setup and Configuration Tool is
addressed in the following tutorial (insert link here).

The Web and local Access settings you see on the
right side of the window will allow for security settings for each document
created. The default is Administrator Settings. Simply check the boxes off for
the User Access Profiles that you would like to have access to this document.
Local Access refers to users within your
organization. Web Access refers to any users outside of your organization that
you would like to collaborate with through one of our Web Modules. Access
through the web will be determined here with the profile you set and within
their Customer file with the security permissions you set for them to be able to
collaborate on projects, documents, etc.
You can view an existing document by simply
double clicking it, or selecting the document and clicking the Edit button. To
remove a document, select it and click the Delete button.
After you choose the Category of your Document then
specify if this is a New Document you are creating within Tradepoint, Creating a
Link to a Document, Importing a Document, or Importing an Existing
Document.
To create a New Document simply choose the Category
of Document, enter in any description, click on the New Document button and then choose the type of document you
want to create. Tradepoint will then start the version of Office you have on
your computer and will save the document within Tradepoint to the specific file
you have specified.
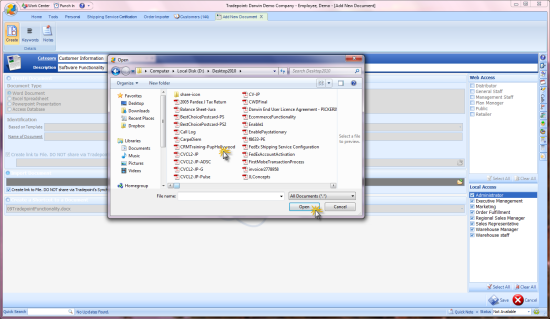
Importing an existing Document will open a window
similar to what you see below prompting you to choose the location of the file
you would like to import. When you have finished click the Save button at the
bottom of the page.

Creating a Link to a Document is what we recommend
for image files and AutoCAD documents. This functionality allows for one or
multiple people to access a file from one location usually a dedicated server
and work with it without copying that file into Tradepoint.
To add a new document, simply click the New
button and you will be presented with the Add New Document window.