6.29.1 Orders - Drop Shipping
Oct/19/2008
Processing a drop shipped
Order can be handled in a few steps per Order.
Note: If you are using an
Ecommerce solution note that web Orders will still be pushed into Tradepoint
through your website. The corresponding Purchase Orders will have to be
authorized with the auto-generate PO tool through each Order that comes in
through the web.
From an Order screen to use the automatic
PO tool use these steps.
1. Check off the Drop Shipped box to
enable the auto-generate Purchase Option.
2. Choose 'In Production' from
the drop down Status option.
3. Save the Order.
4. Check off the
Print option for an order (if desired).
Even if your
Products are set to be Inventoried Items you can over ride that option for each
item in a given Order. For items that are set to be non-inventoried and drop
shipped this will NOT be an option within Orders.
Once the Save icon is
clicked if you have a Preferred Supplier set up for the Product then the
Purchase Order will be automatically generated within that Preferred Supplier's
account.
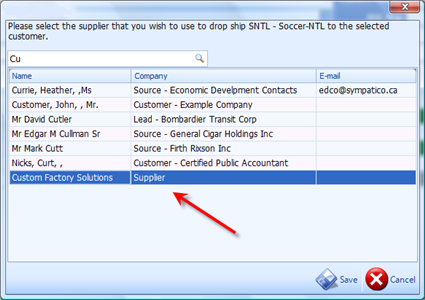
If there is not a Preferred Supplier set up then you
will be prompted to choose a Supplier through the window you see
below.

Simply
type in all or part of a Supplier's name and a list with the search results will
populate in the window. This example has a partial name, and you can see the
results. You also can see the contact type.
Highlighting the Supplier
and clicking the Save icon will then generate the Purchase
Order.
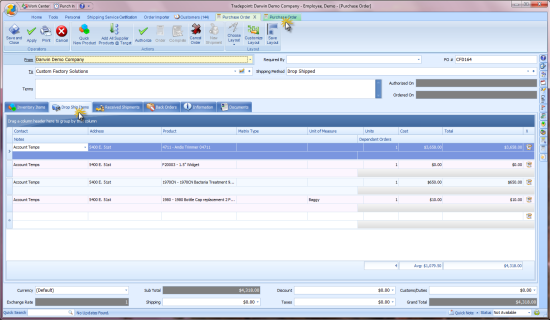
This Purchase Order has automatically been set up with
several options already pre-selected.

1. The
Drop Ship icon in the tool bar is lit since the PO that will be printed out will
be for Drop Shipping.
2. The default Shipping Address is chosen and can
be seen in each line item of the PO.
Please
Note: If there are multiple Shipping addresses you
can specify one from the Search icon in the right side of the Address field.
This can also be specified within the Order when it is
created.
3. The related order information is a part of
each line item.
4. Specify the Shipper for this Order
5. Click
the Authorize icon
6. If your User profile allows also click the order
icon to print out the Purchase Order. The print Option screen shown below will
appear.

The
following screen after the Print Out option is chosen will direct you to the
Print preview screen for Purchase Orders.
This option will be
by-passed when you only have one Purchase Order form available. When multiple
forms are available you will see this before the Print preview screen.
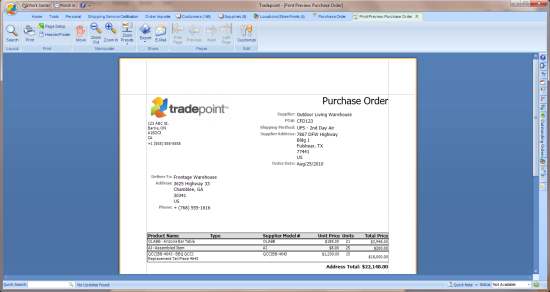
The
next screen will direct you to the Print preview screen for the Purchase
Order.

This example
is a default report. The email and Export options above are the easiest way to
send out Purchase Orders.
Once the Purchase Order has been Printed, Emailed,
or Exported as a file the Purchase Order will be saved to that Supplier's
account and listed similarly to the example below.
Note: For web Orders the process is the
very much the same. Email notification will let you know how many orders have
come in either overnight or when you are away from your computer. Search Tools
and Reports can also be used to bring up all Orders that need to have Purchase
Orders generated for Drop Shipping.
Related Articles
<Articles>