6.30 Invoices
Oct/17/2005
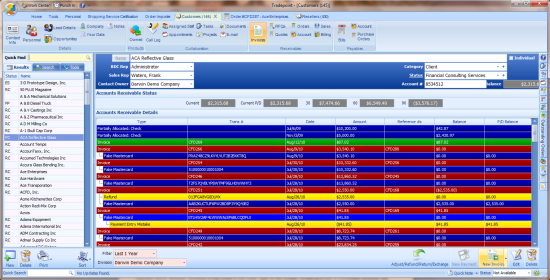
The Invoices screen allows you
to view all invoices and payments for the contact.
The ledger can
be filtered using the Filter field in the bottom
left.
By default you will only
see items from the last 1 year, but you can select a different filter to
view older items when needed by using the drop down menu accessible through the
arrow on the right side of the field.
If you post date a payment, the
Balance on the invoice will show that there is still money owing. The P/D
Balance column shows what the balance will be including all post dated
payments.
The footer of the
ledger contains the total Balance and P/D Balance for the items
displayed in the ledger (based on the filter selected). Below the ledger
are the total Balance and P/D Balance for the contact, including all items
regardless of the filter applied.
Invoice
Entry
A new invoice can be created
automatically from the Order screen when you have completed an order, or by
clicking the New Invoice button on the Invoices
screen.
Note that when you are saving an
invoice you must select whether it is complete or not. An incomplete invoice is
not applied against the contact's balance, and will agree as a green row on the
ledger.
The screen below shows a the window
you will se when you would be either viewing any existing Invoices or going to
create a New Invoice. Any existing Invoices will be listed here. To create a New
Invoice click on the 'New Invoice' icon in the lower right hand
corner.

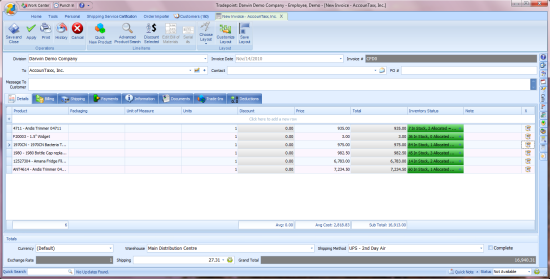
The screenview below is the window
you will enter in your information to generate an Invoice. This is also the same
screen where you will make any changes to edit an existing Invoice.

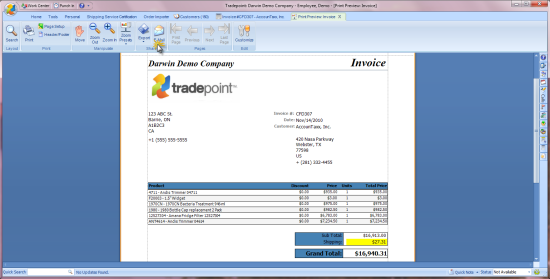
If you are needing to print or email
this Invoice simply click the complete box and click on Pring and the following
screen will open with the options for printing and emailing this Invoice. The
default document type Tradepoint uses for emailing documents is a PDF
document.

Additional information regarding
document management is covered in the following article, XtraReports.
Payment
Entry
When a contact is making a payment
on an outstanding invoice, simply select the appropriate invoice and click the
New Payment button. 
This will automatically apply the
payment to the selected invoice. If you wish to apply a payment to multiple
invoice you can hold CTRL and click on multiple invoices, or you can allocate
the payment to a second invoice while on the payment window.
Pre-payments, or payments that have
not been completely allocated to an invoice will appear as a purple row at the
top of the ledger.
Please see the Payments article
below for full details on entering a payment.
Adjustments
If you need to make an adjustment to
an invoice or a payment because of an entry mistake, a failed payment, or any
other reason, simply select the item you need to adjust and click the
New Adjustment button.
Depending on the item type you have
selected, you will be taken to the Payment Adjustment or Invoice Adjustment
window where you can make the appropriate adjustments.
Refunds
When you need to refund an invoice,
simply select the invoice and click the New Refund
button.
Related Articles
<Articles>