Configuring IIS to run Tradepoint for Web on your web server
Nov/10/2005
<Subject>
<Date>
This article will walk you through the process of
configuring IIS for the Tradepoint for Web module on your web
server.
System Requirements and Required
Components
The following components are required to run the
Tradepoint for Web module.
- The computer must have Windows 2000, Windows XP
Professional, Windows Vista, Windows 2003 or later.
- Microsoft Internet Information Services (IIS)
version 5 or later must be installed.
- To install IIS go to Start -
Control Panel and select Add or Remove Programs.
- On the Add or Remove Programs
window click the button on the left-hand side label Add/Remove
Windows Components.
- In the list of components select Internet
Information Services (IIS).
- Insert your Windows CD and click the Next
button to install the IIS component.
- Microsoft .NET Framework 2.0 must be installed.
It can be download from the Microsoft web site from this location: http://www.microsoft.com/downloads/details.aspx?FamilyID=0856eacb-4362-4b0d-8edd-aab15c5e04f5&DisplayLang=en
Configuring IIS
- Open IIS Manager
- Go to Start - Control Panel -
Administrative Tools - Internet Information Services
(IIS)
- In IIS 6 or later, right click on the
Application Pool folder and choose New - New Application Pool. Enter Net2.0 as
the name and add the pool with the default settings.
- To determine which version of IIS you are
running, go to Help - About Internet Information
Services and look for the version number on the window that
appears.
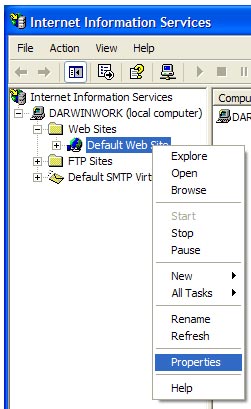
- Under the Web Sites folder, right click
on the Default Web Site entry and choose
Properties.
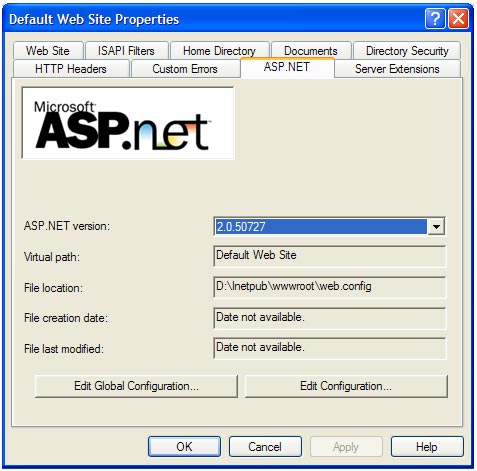
- On the Default Web Site Properties
window go to the ASP.NET tab and set the ASP.NET version to
2.0.
- Next, go to the Home Directory
tab. Ensure that the Local Path field is pointing to the directory
where you have place the Tradepoint for Web files for your
website.
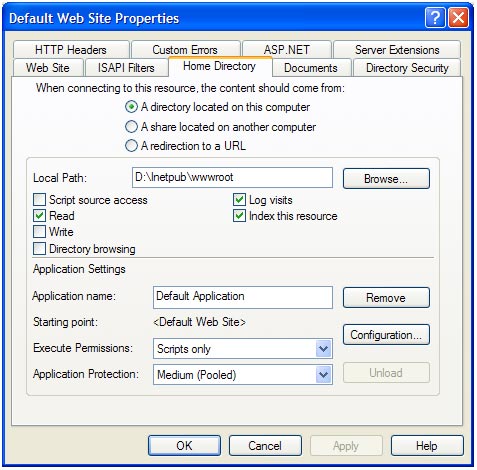
- Under the Application Settings heading
ensure that an application has been created. If the application name field is
disabled, click the Create button to add a new application.
- Set the Execute Permissions to Scripts
Only.
- In IIS 6 or later, set the Application Pool to
the Net2.0 pool that you created in step 2 of this section.
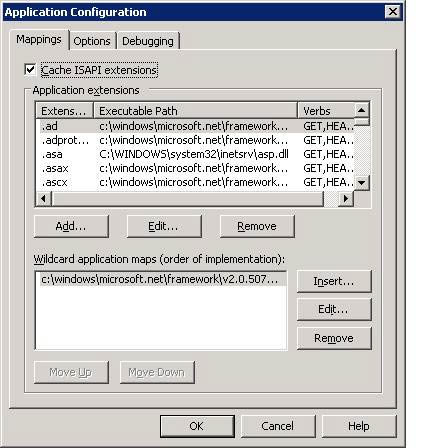
- Click on the Configuration
button.
- In IIS 5, click the Add button on
the Application Configuration window.
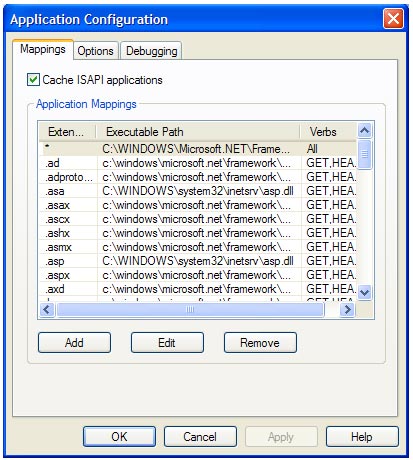
- Click the Browse button beside the Executable
field and point to the file: <Windows
Directory>\Microsoft.NET\Framework\v2.0.50727\aspnet_isapi.dll
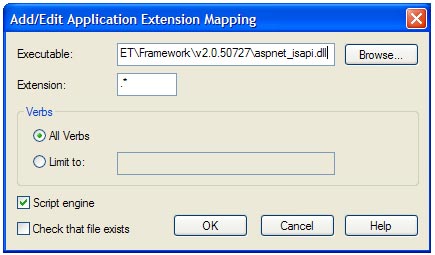
- In the Extension field enter: .*
- Uncheck the Check that file exists
box
- Click OK to add the entry and then click OK on
the Application Configuration window.
- In IIS 6 or later click the Insert
button on the Application Configuration window.
- On the Add/Edit Application Extension
Mapping window click the Browse button beside the Executable
field and point to the file: <Windows
Directory>\Microsoft.NET\Framework\v2.0.50727\aspnet_isapi.dll
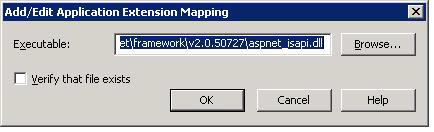
- Uncheck the Verify that file exists
box
- Click OK to add the entry and then click OK on
the Application Configuration
window.