Darwin Demo Database Installation as a 2nd Instance of Tradepoint
Jan/17/2006
This file will walk you through how to install the Darwin Demo
Database version of Tradepoint as a staff member. Normally customers will never
have to go through this process. It is a Microsoft "Install Shield" limitation
that forces us to have such an involved process to install International
Holdings. We apologize. Enjoy the process.
How to Prepare the Darwin Demo Database:
1)
Either print out this KB article or copy the entire article and
paste it into Word or Wordpad in order to refer to it during this manual
installation process
2)
Log out and exit out of Tradepoint.
3)
End your SQL process:
·
Press the [Alt], [Ctrl], and [Delete] keys at the same time
to bring up the Task Manager:

·
Click on the Processes tab:
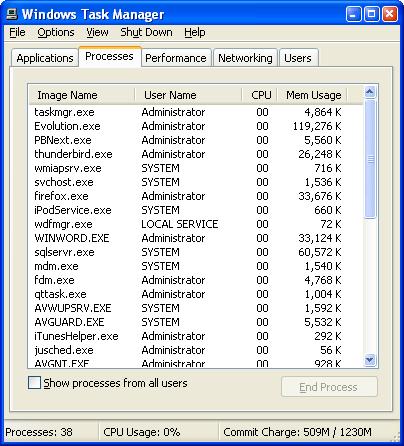
·
Scroll down to locate the line that begins with
sqlserver.exe and highlight it:

·
Click the [End Process] button in the lower right
hand corner of the Task Manager window.
4)
1) Navigate to C:\Program Files and copy the folder
"Tradepoint"
5)
Paste the "Tradepoint" folder into the same directory C:\Program
Files.
6)
Right click on the "copy of Tradepoint" folder and click "rename"
(second item from the bottom of the pop up list)
7)
Rename the folder to “DDD”
8)
Double click on your new “DDD” folder
9)
Double click on the “Database” folder
10) At present, this folder
should have two files in it: “Tradepoint.mdf” and “Tradepoint_log.ldf” Delete these two files.
11) If you have not already
downloaded the file, download http://tradepoint360.com/Tradepoint/DDDMDF.zip
and save it to your computer (Please remember where you save the file)
12) Navigate to and open
the “DDDMDF.zip” file you downloaded from our web server. (Wherever you saved
it)
13) In that zip file should
be two files: “Tradepoint.mdf” and “Tradepoint_log.ldf”
14) Highlight those two
files with the mouse, then copy them both. (this can be done by holding down the
[Ctrl] button and pressing the [C] button at the same time)
15) Navigate back to the
DDD database folder you were just in (in step 7 of this procedure [C:\Program
Files\DDD\Datatabase])
16) Paste the Tradepoint.mdf
and Tradepoint_log.ldf files into this database directory (this can be done by
holding down the [Ctrl] button and pressing the [V] button at the same
time)
·
Rename both files by right-clicking on each file. Change “Tradepoint.mdf” to
DemoTradepoint.mdf, and change “Tradepoint_log.ldf” to DemoTradepoint_log.ldf”
17) At this point (since we
ended the sqlserver.exe process), you must reboot your computer in order to
start up your regular, live copy of Tradepoint. After a successful reboot, please open
up your normal, live copy of Tradepoint.
18) After you have
re-logged into Tradepoint, look on the menu items at the top of the screen and
click “Darwin Tools”
19) From the drop down,
select: "Database Connect Tool..."
20) In the window that
opens, on the “Database Path” row of information, please click the pencil
icon.
21) In the file name
section of the window that pops up please paste this path “C:\Program
Files\DDD\Database\DemoTradepoint.mdf” and click the [Open] button located to the
right
22) You will now notice
that the correct path is located beside the “Database Path” entry. Beside
“Database Name” in the blank field please paste the words: “DemoTradepoint” Then
click the [Save] button
23) We are almost there.
Navigate back to the database folder where you pasted the Tradepoint.mdf and
Tradepoint_log.ldf files
24) Navigate back one step
out of the “C:\Program Files\DDD\Database” to the folder C:\Program
Files\DDD
25) In the huge list of
files, look for the “Tradepoint.UserConfig” file. It should be about half way
down the list. Double click this file to open its contents in notepad. [if
Windows does not know what program to use to open the file, please select:
"select a program from a list". A seperate window will open. Please double click
on notepad icon and the file should open correctly.]
26) This file contains a
pile of raw data (an XML file). You will see some tags like:
·
<FirstRun>False</FirstRun>
·
<ServerName>___(somedata)___</ServerName>
·
<DatabaseName>Tradepoint</DatabaseName>
27) In the last item I
mentioned change:
·
<DatabaseName>Tradepoint</DatabaseName>”
to
·
<DatabaseName>DemoTradepoint</DatabaseName>”
28) Look for another
tag:
·
<ProgramTitle>___(some
data)___</ProgramTitle>
·
If the tag exists, replace it with <ProgramTitle>Darwin Demo
Database</ProgramTitle>
·
If the tag does not exist, create a new line below
<DatabaseName>DemoTradepoint</DatabaseName>
·
paste: “<ProgramTitle>Darwin Demo
Database</ProgramTitle>” into the new blank spot
29) Save the file by
clicking the [File] menu button located at the top of the screen you are in, and
clicking [Save] from the drop down menu (or if you are keyboard savy click
[Ctrl] [S]). then close the window by clicking the red X button.
30) Finally, in the window
where you loaded the “Tradepoint.UserConfig” config file. Please look for the
Tradepoint.exe file [sometimes the ".exe" file extension is hidden. If your
".exe" extension is hidden, the Tradepoint icon you want to select is the one
that looks like the "world with computers" or "spark plugs" wrapped around it].
Once you have located it, click and hold down your mouse button, drag it over
your XP “start” (green) button located at the very bottom left of your screen
and drag the file up to wherever you would like a short cut to be created. I
prefer either at the very top of the left hand list or under the program files
directory.
31) After you have chosen a
place by dragging the file, let go of your mouse button. Right click on your new
short cut and click rename. Rename the short cut to “International Holdings” and
you are all done.
32)
Conclusively:
For an an added touch you can perform item
#24 to the “Tradepoint.UserConfig” file that is located in the “C:\Program
Files\Tradepoint” directory. But do not use the name “Darwin Demo Database” in
the <ProgramTitle></ProgramTitle> tags. Use
“<ProgramTitle>Tradepoint</ProgramTitle>”. If the tags do
not exist simply create new ones after the <DatabaseName> tags.