13.15 Press Releases
Apr/15/2007
Press Releases are
also managed through the Tools Tab. Clicking the Press Releases icon as shown
below will open the main page where the structure of your Press Releases are
managed.

Below is a screen
view of the main view of the structure of your Press Releases.

Your press Releases
will be structured in a collapsible format allowing you to drill down into a
particular Category of Articles. The New Press Release icon  will open the window where you can create a
New Press Release and related settings.
will open the window where you can create a
New Press Release and related settings.
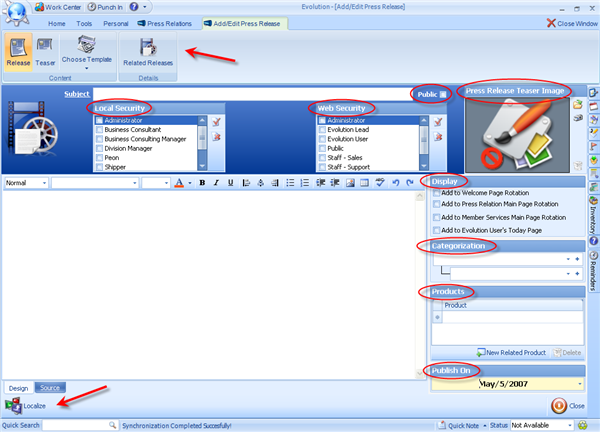
The icons at the
top of the window will give you the ability to setup the Teaser Page, Choose
from and Existing Template, and attach Related Releases to the one we are
creating here.
Assign the Subject
to the Press Release and check the 'Public' box if you would like the Press
Release to be Public.
Local Security-
These User Access Settings pre-populate from the Security Section
of Tools where the User Access Profiles are created. Check off any that apply
unless this article is meant to be Public. In that case click the 'select all'
icon to the right of the window.
Web Security-
The same will apply to web security. The User Access Settings
pre-populate from the Security Section of Tools where the User Access Profiles
are created. Check off any that apply unless this article is meant to be Public.
In that case click the 'select all' icon  to the right of the window.
Press Release Teaser
Image- If you want an Image attached to your Press Release
then click on the Import or Scan icon just to the right of the Image window.
Follow the prompts to insert your image and it will be viewable within the Image
window here and on the web as well once you synchronize.
Display-
The Display section enables you to manage where and how many
locations on your website you would like to have it visible to people looking
through your website. Simply check the desired locations and save your changes.
They will be added to your website once you synchronize.
Categorization-
Categorization creates the collapsible topics structure seen on
the first screen view where the outline of the Press Releases is shown. Simply
choose from the Categories and Subcategories available for your Press Release.
If you need to create a
new Category or Subcategory click the blue plus on the right side of the field
and follow the prompts in the Setup and Configure Tool to create the Category
and/or Subcategory you are looking for.
Products-
If you would like to attach a link to e Product from the Press
Release you can search for and attach your Product here. The benefit of this
tool is to allow individuals to go directly to your Products Page from a Press
Release.
Publish On-
This is where you choose the date you would like to have the
article released on. Articles that have a future date assigned to them will
become available on your website with the configured preferences on that
day.
We do recommend adding
the content directly into the HTML Editor. Content can of course be added
through Cut and Paste or Copy and Pasting however, that may result in formatting
issues with your text. Editing tools for your content are found in the toolbar
at the top of the content window.
When you have
finished adding your article Save your changes. The next time you Synchronize
your Press Release will become available on your website.
Related Articles
<Articles>